Password Manager
As part of this initiative, we replaced the standalone product with a fully integrated Password Manager, successfully migrating all existing users.
This transition led to a smoother onboarding experience, reduced drop-off during setup (15% increase onboarding completion, 9.8% lift user engagement), and stronger feature adoption across platforms.


Identifying an opportunity
With this project, I didn’t want to just create a Password Manager, but I was interested in how we could change the way people perceive password security, and in how password security fit into the larger system of personal online security and privacy.
Design goals
01
Change how people think about password safety, promote good password habits, and help people feel safer and in control of their info.
02
Make the Password Manager more than just a tool for passwords by integrating it into McAfee’s protection system, and leveraging it to drive cross-product acquisition and conversion.
These questions guided our design strategy and team efforts. My primary focus for the initial release was tailoring the experience for both new and experienced password manager users.


A successful design starts with people
To kick off, I started by understanding what a Password Manager does and what people expect from it. This involved reviewing existing research on password management products and comparing different options available. Here are some key things I found out:
01
Managing passwords is a hassle. People want a better, safer way to handle passwords but are a bit unsure about using password managers
02
Many people know that some of their passwords aren't very safe and could be guessed easily. They want stronger passwords but worry about forgetting them
03
People want password managers to be convenient, like filling in credit card details or common forms automatically, warning them if a password is weak, or using biometrics for extra security

Defining product requirements
I worked closely with the Product Manager to figure out the main things users need to do with the Password Manager.
From there, I collated all the needs we had identified into 3 core requirements for the Password Manager. These requirements were shaped by the existing data highlighted above.
01
Effortlessly add and store passwords/logins securely, find them quickly when needed, and securely share them with people you trust
02
Easily create strong passwords without the fear of forgetting them or losing access to your vault
03
Convenience and timing matters: autofill details, auto save passwords, and notify about weak passwords, at the right moments
A Password Manager that fits
into the McAfee ecosystem
Since the Password Manager was going to be part of the McAfee product system, it was crucial to understand the opportunity for key touch points within the product on other platforms like desktop, web app, and web extension. This helped me figure out how the password manager's key features would interact with other features across each platform.
Defining a framework for product entry cross OS
The next task was to find the best point in the user journey to introduce the password manager, in a way that felt natural, un-intrusive, and would encourage its continued use.
To find the answer to this dilemma I set up various discussions with the designers of the different platforms. From those discussions, I pinpointed three places users might begin using the password manager, based on what it does:
01
Self discovery on the dashboard
02
Using it contextually when they need it, like when logging into a website or updating a password, etc
03
Opportunity for connected protection with other features in the product

Once I had these possible trigger/entry points identified, I moved on to mapping out the flow for the core experience.
Mapping out the onboarding experience
In conceptualizing the onboarding experience for the Password Manager, I initially explored two paths:
01
Guided Onboarding: a structured set up process aimed at leading users through each step one at a time
02
Self-directed Onboarding: present users with options upfront, granting them the freedom to navigate through setup actions at their own pace
Both paths would include the same user actions and present the user with the top 3 tasks we identified based on the most common actions for setting up a password manager vault:
Securing your vault
Create a master password
Enable biometrics to unlock the vault
Setting up your Vault (with the top 3 tasks)
Add a password/login item
Enable Autofill
Add a device

However, I reassessed my initial approach once we got insights from an intercept survey conducted with current McAfee users to understand how they manage their passwords and their perception of password managers.
Adopting a research-led onboarding strategy
For the discovery research conducted, we focused on understanding how our users manage their passwords, what makes Password Managers (PWMs) important to them, what encourages them to install a PWM, and what tasks they want PWMs to handle.
We also looked into the worries or challenges users face when starting to use PWMs and what they like or dislike about their current PWM solutions.
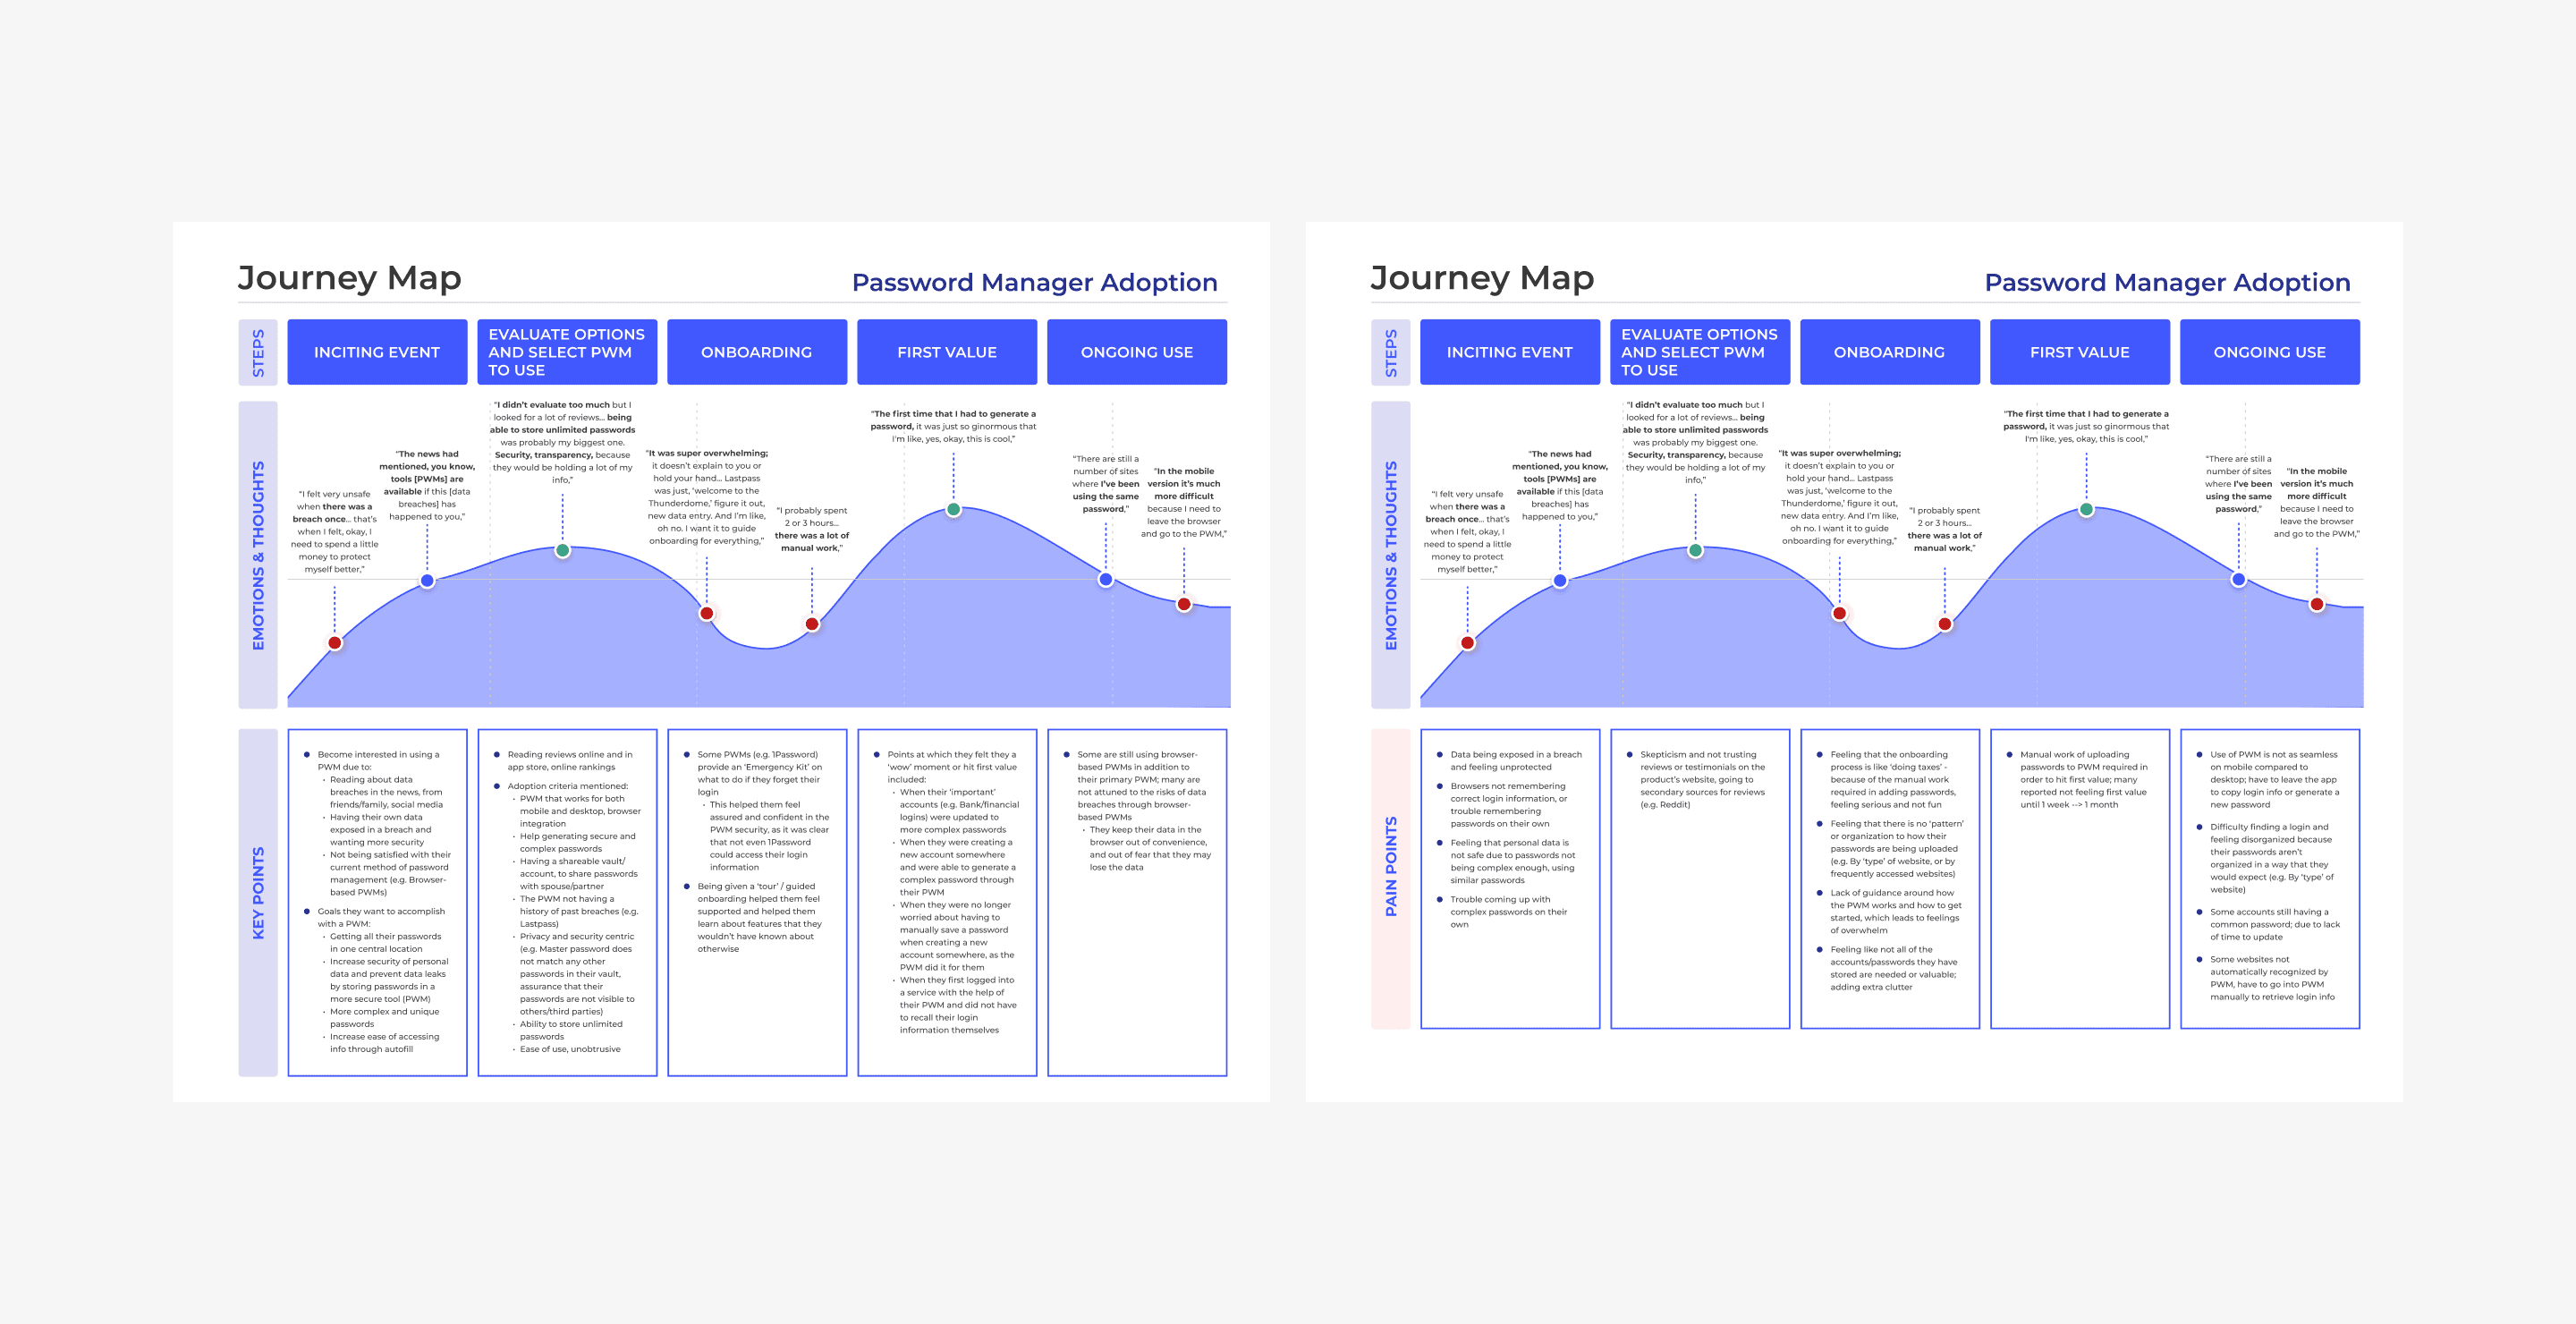
We found that most McAfee users hadn't used Password Managers before. Those who had were hesitant to try a new one, probably because they're used to their current one. So, we expected our initial PWM product users would mainly be those who hadn't used one before.
Additionally, many PWM users think their passwords are safe because they use a PWM, even if they also save passwords in their web browsers. But using browser to store passwords can be risky. Some users were also concerned about moving away from storing passwords in their browsers.

To address these concerns, we needed to make our onboarding process easy to follow, especially for those with no prior experience with PWM tools. Furthermore, if we wanted to attract current PWM users, we had to make switching to our PWM worry-free and cost-effective. This could include features like easy import/export for a smooth transition.

According to our research, users typically preferred guided set-up, but they don't want to feel overwhelmed. We had to guide them but also give them freedom of choice in the set-up process. This way, they'd have a relaxed and personalized experience. Our strategy needed to make it easy for new users to start and help current users transition smoothly.
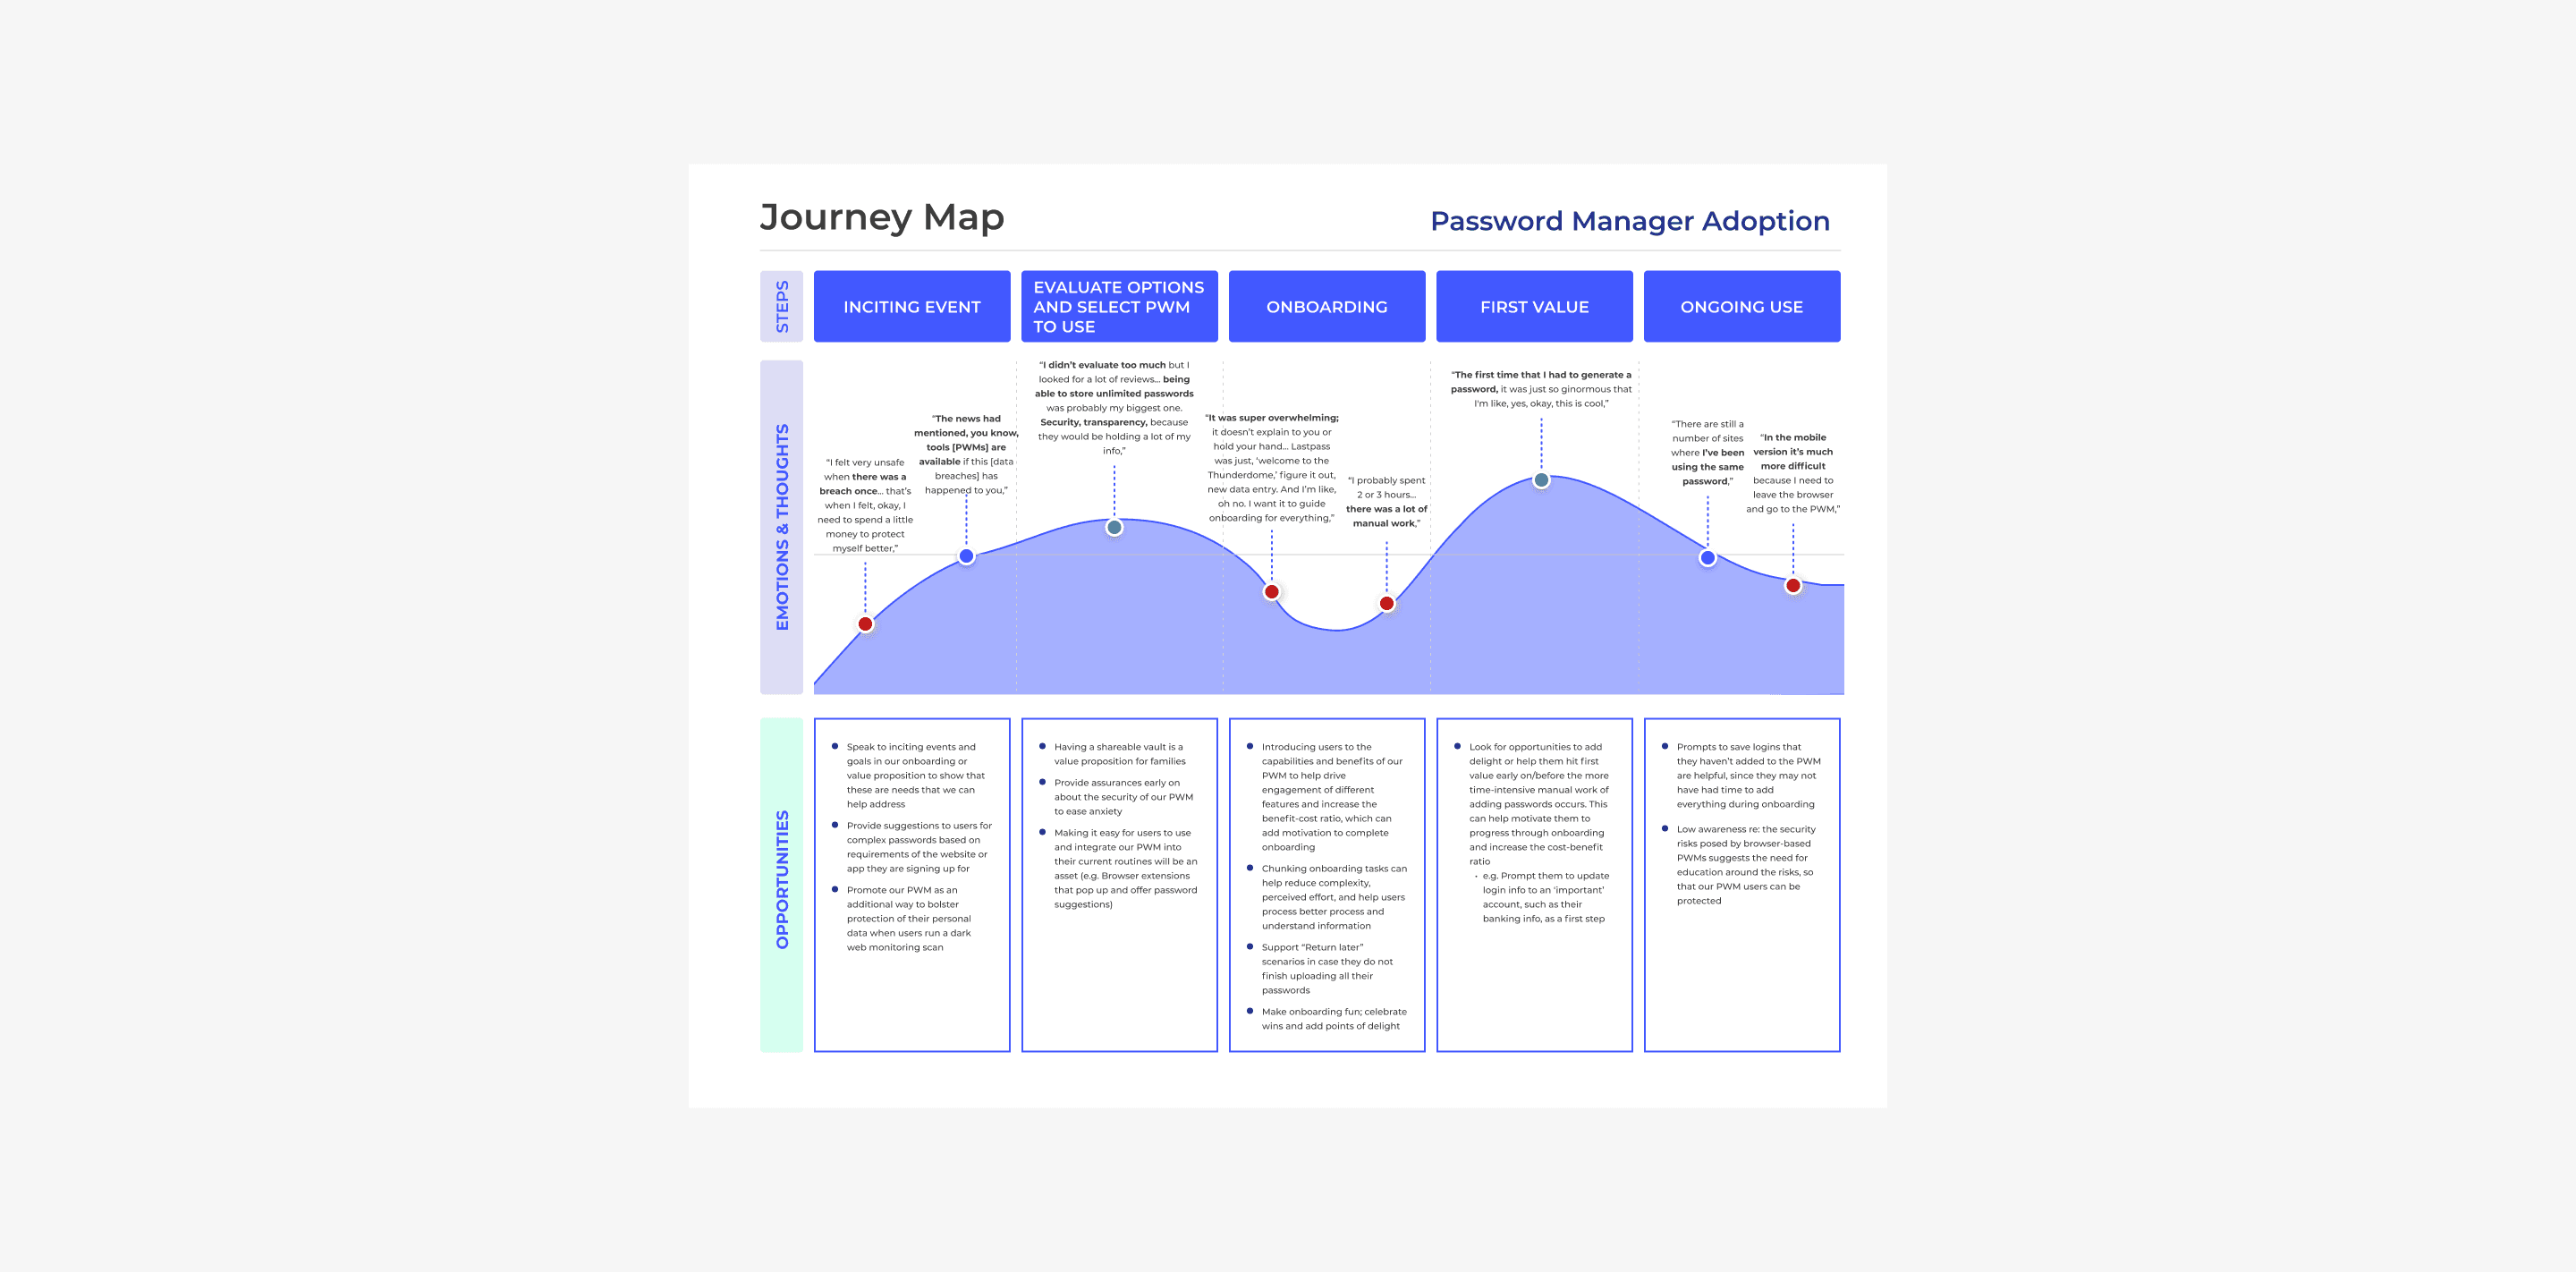
To do this, we needed to show users what our Password Manager could do and why it's beneficial. We needed to motivate them to finish the onboarding and to support those who needed to pause and return later.

After gaining these insights from our researcher, I introduced a new approach to onboarding that combined the benefits of both self-directed and guided methods.
This new approach still presented users with the top three tasks we identified based on the most common actions they want to perform.
However, we now introduce these tasks contextually, stacking them where relevant. After completion of one task, the next is introduced when relevant, creating a seamless narrative.

To address user concerns about feeling overwhelmed and to maintain their freedom of choice, we also provided the option to "return later". This strategy ensures a more user-friendly and efficient onboarding process.
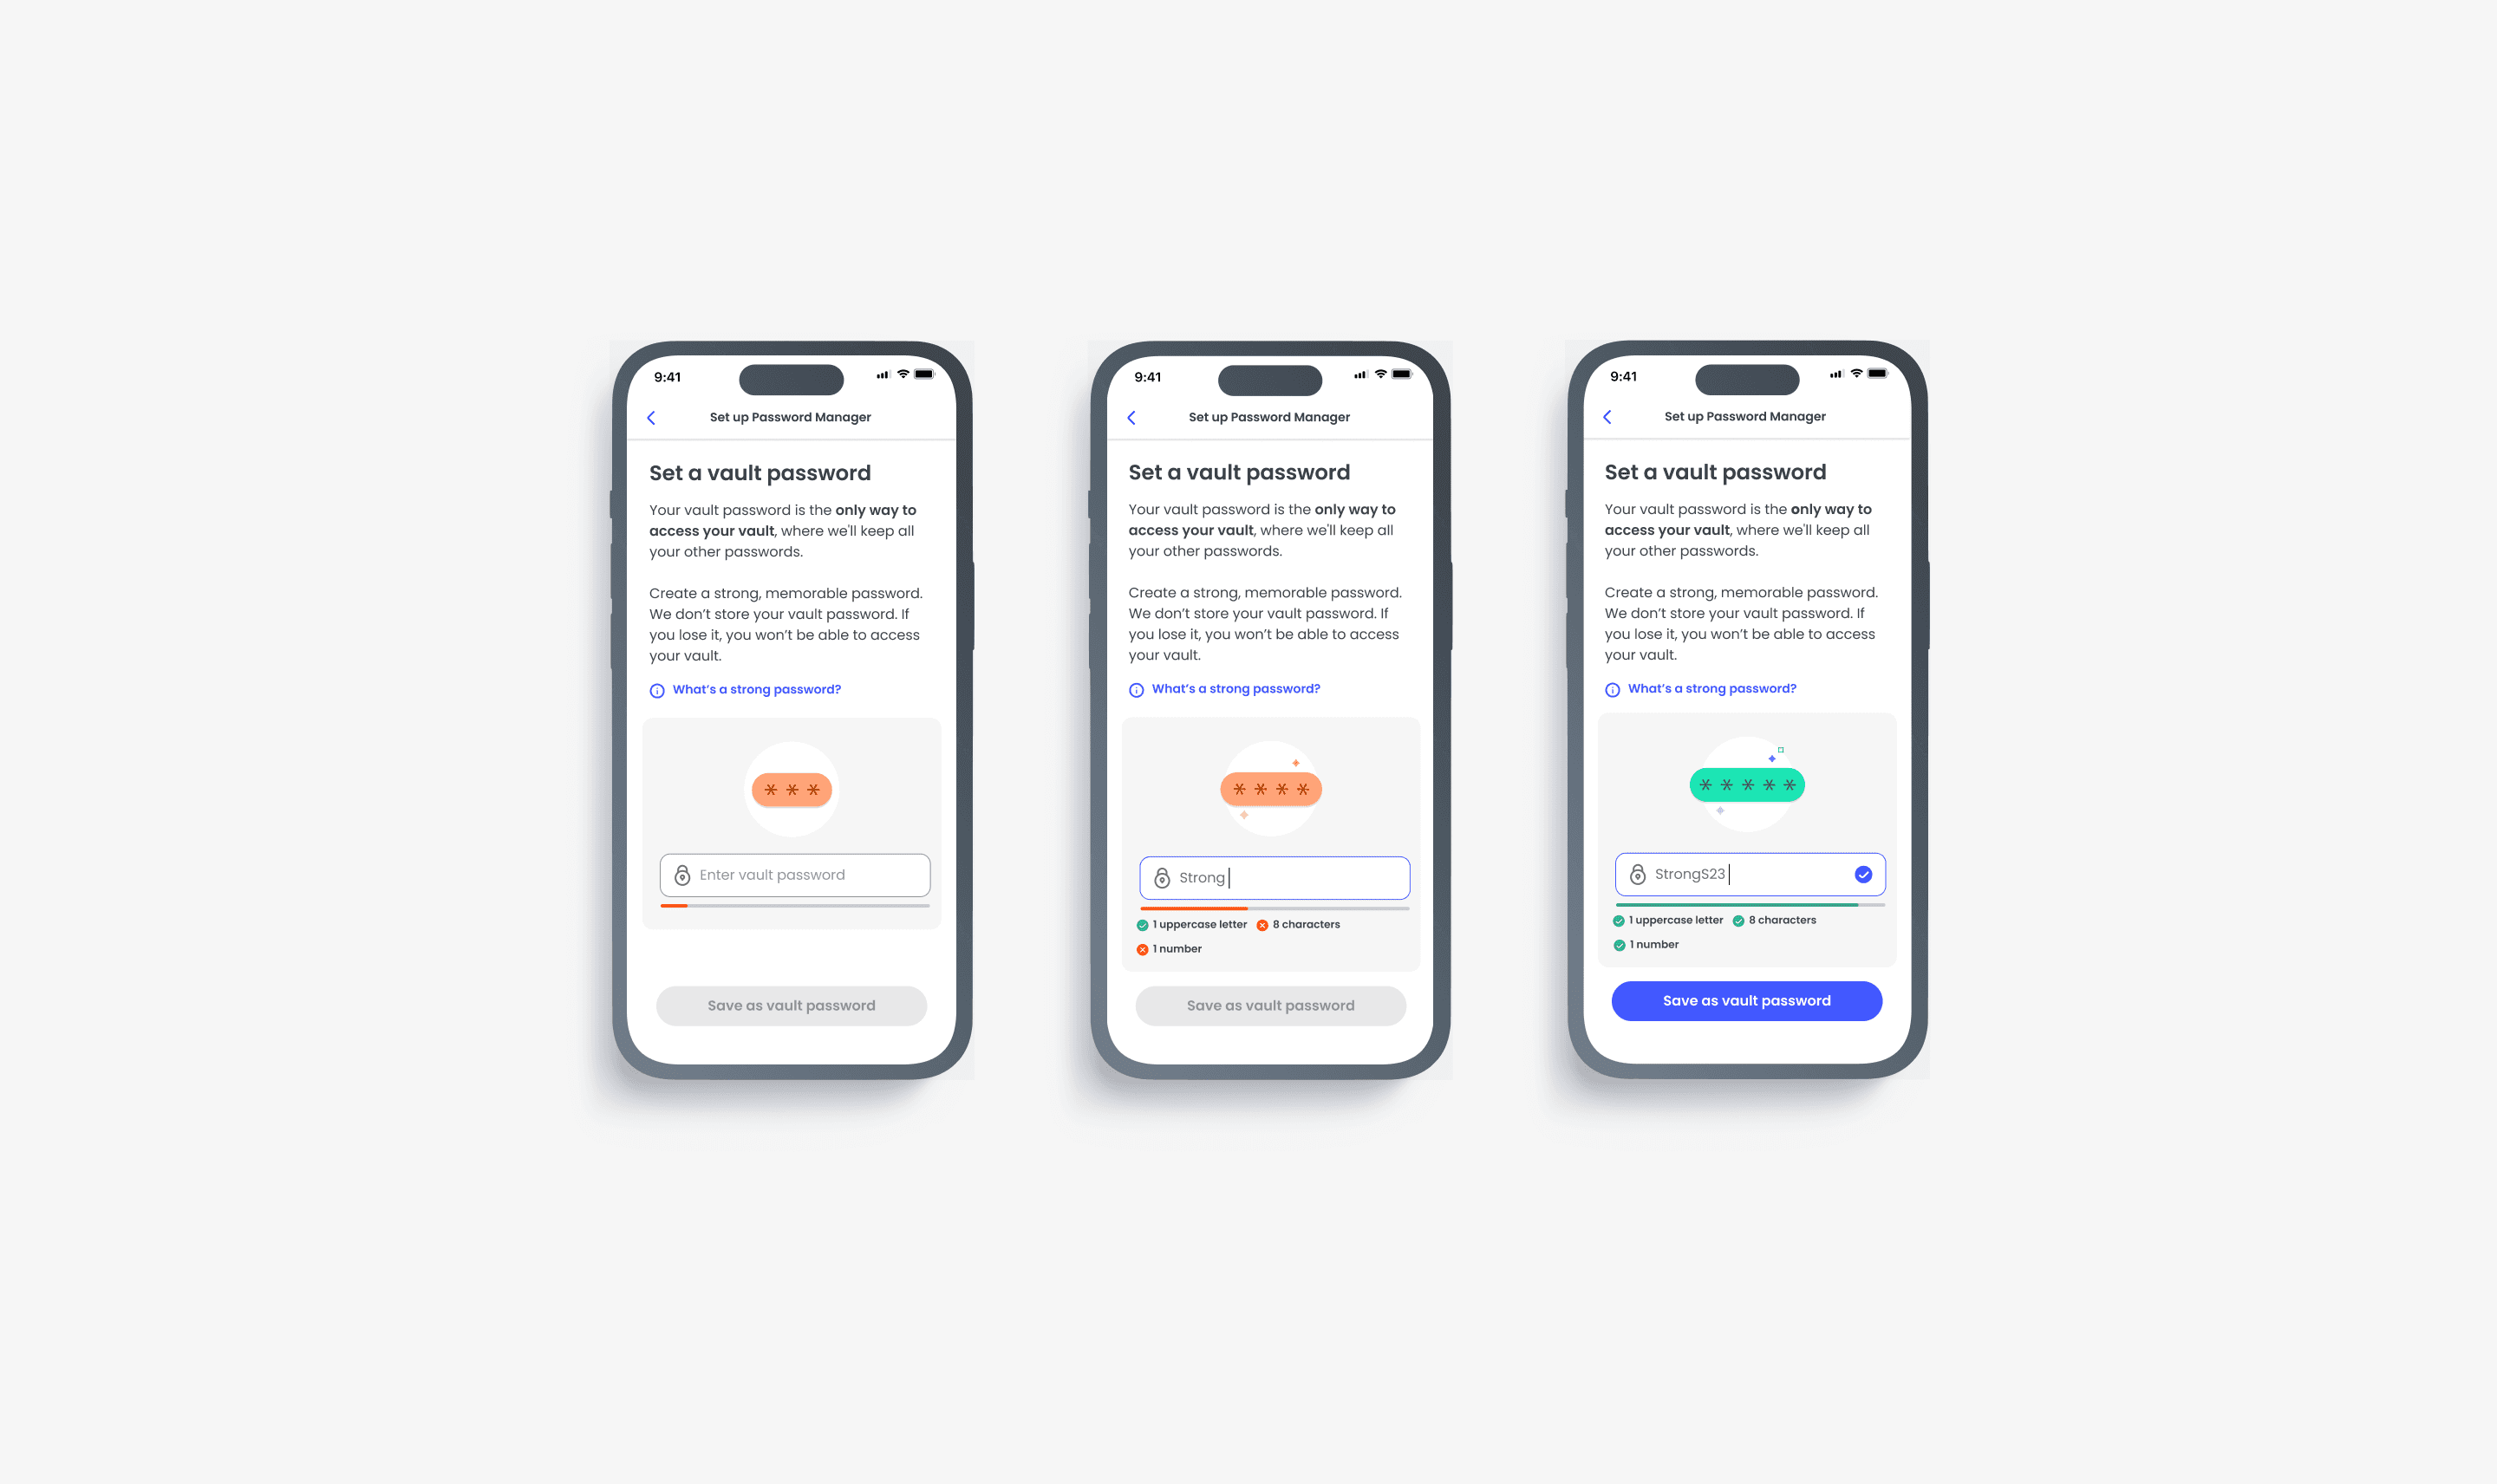
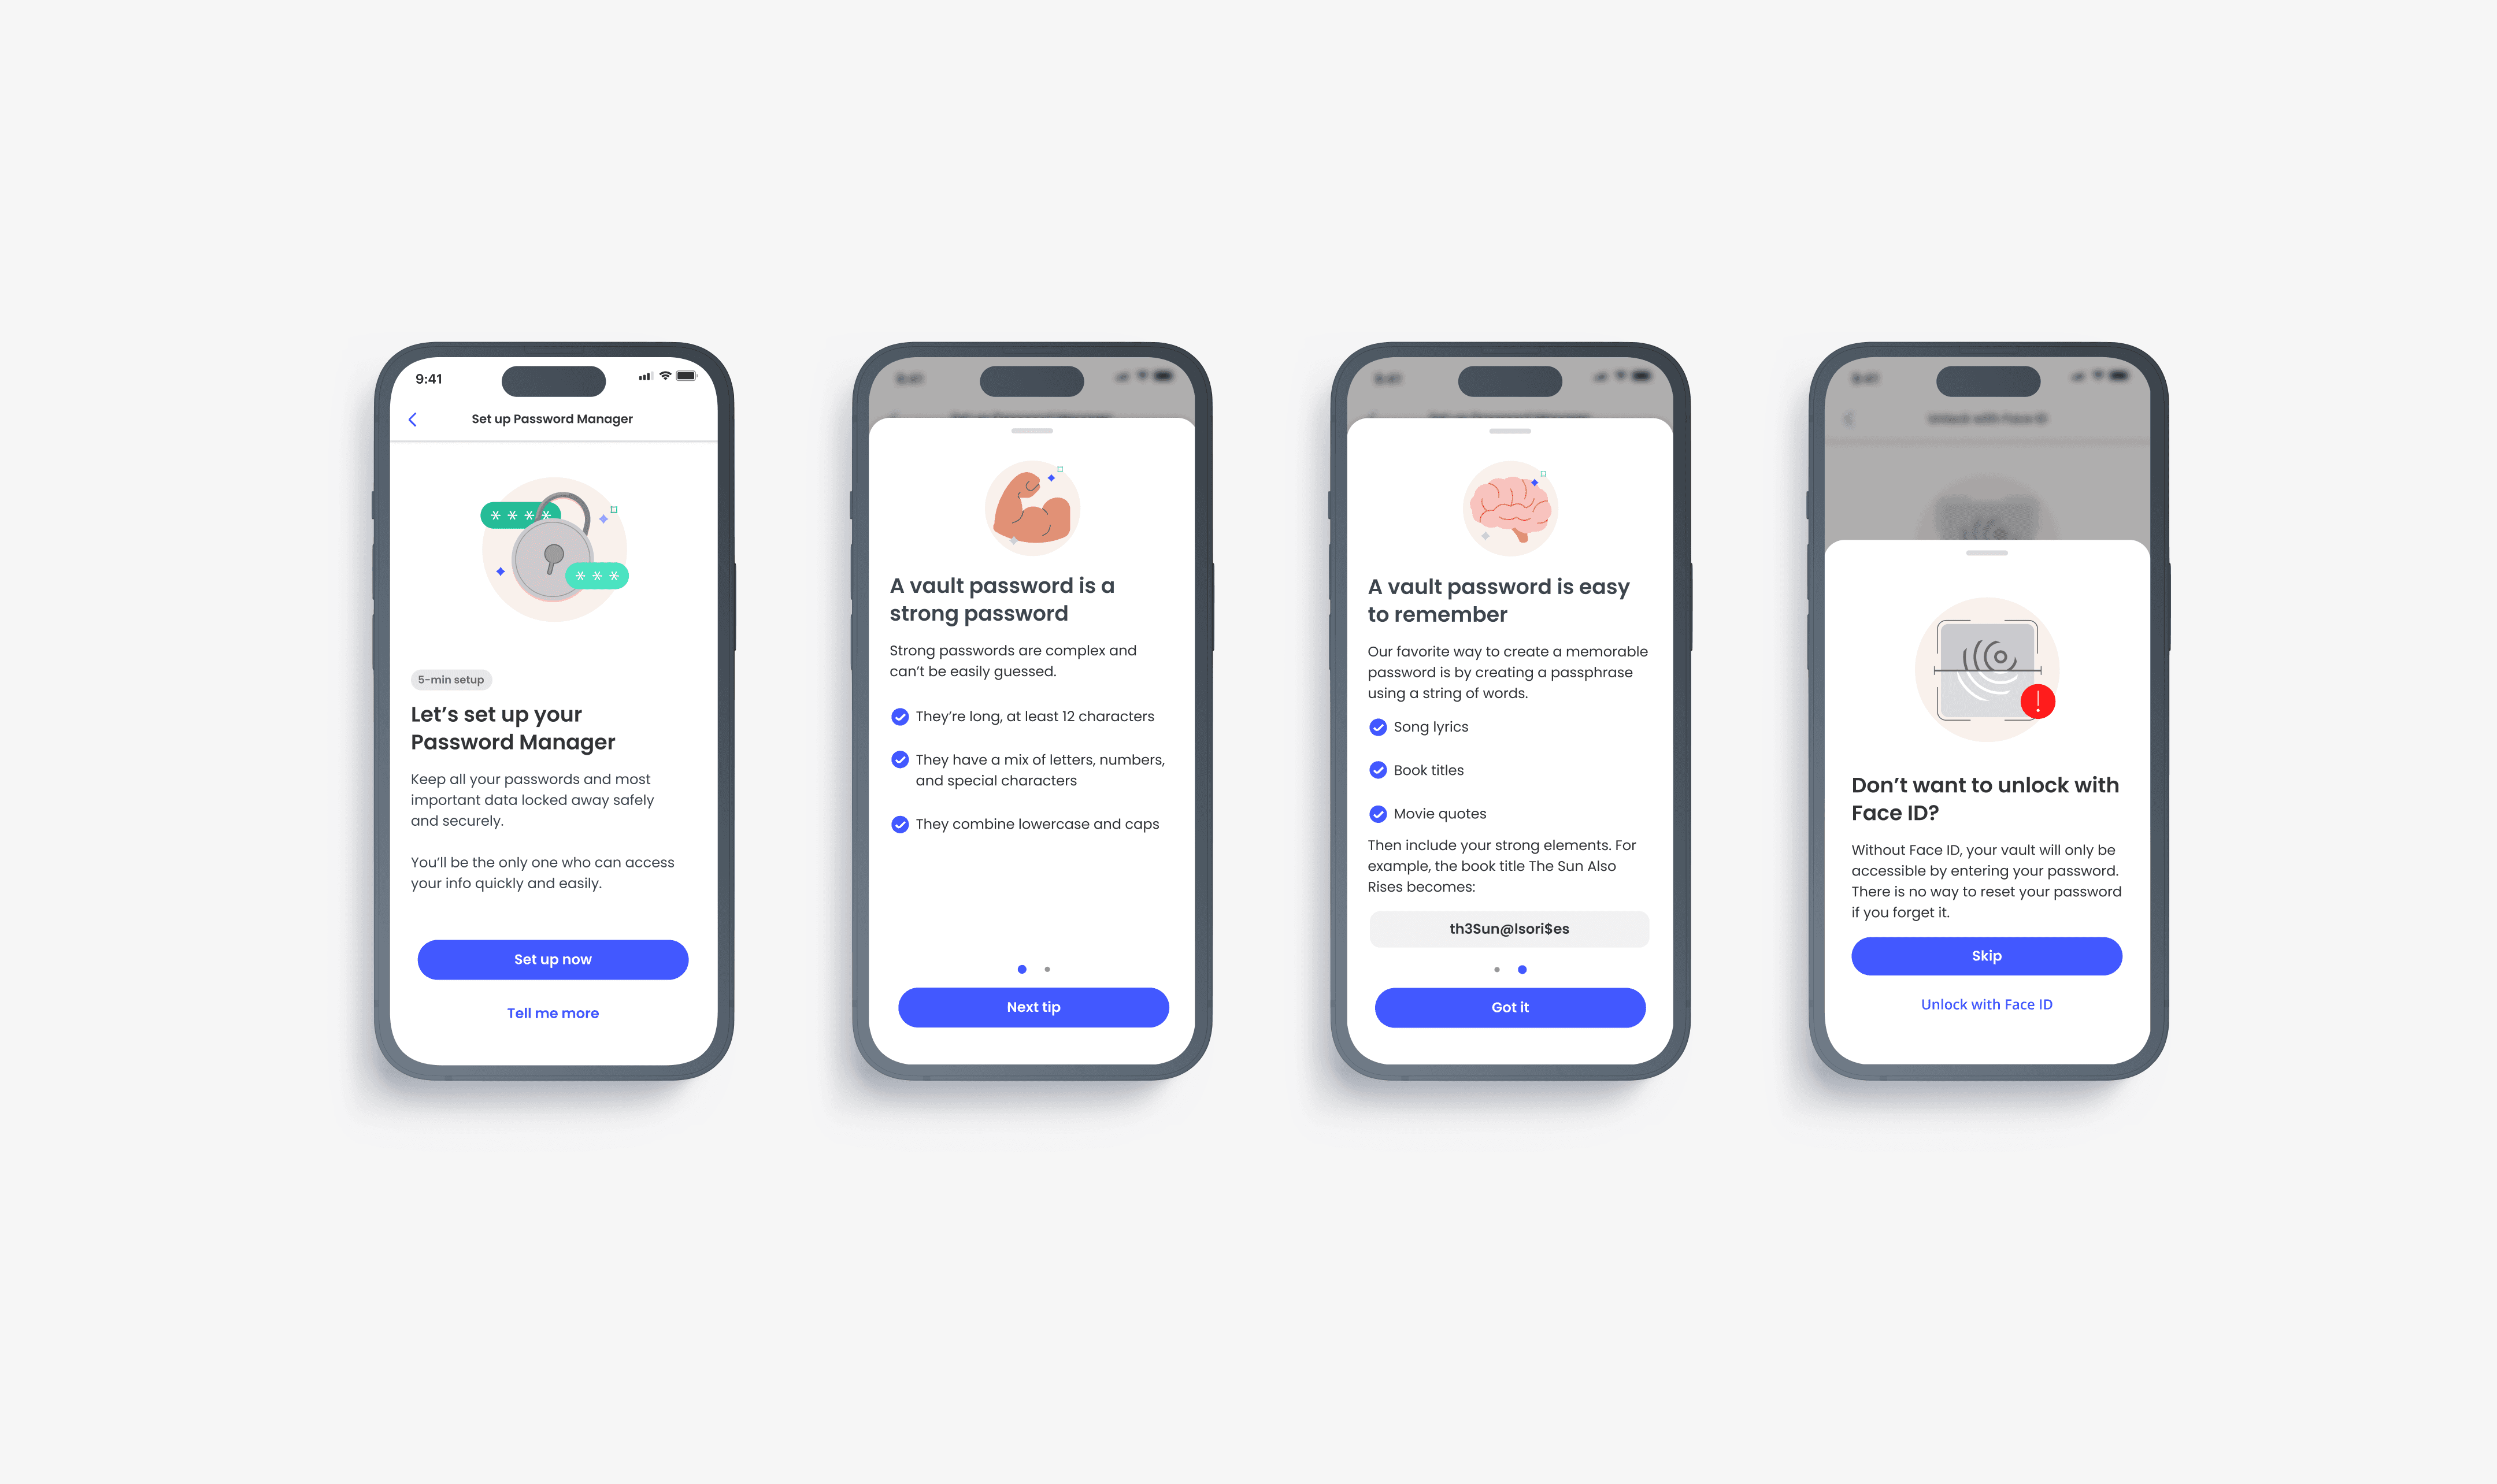
Setting up the Master Password
Setting up the Vault Password
The very first thing a user is asked to do after they’re introduced to the password manager is to secure their vault by setting up a “Master Password”. However, as part of our commitment to inclusive language and accessibility, we renamed the “Master Password” to “Vault Password”.
The Vault Password…A catch 22 scenario
A password manager requires you to remember just one password, the Vault Password. However, if you forget or lose your Vault Password, your vault remains locked and encrypted…forever. This approach utilizes the security concept of Zero Trust Architecture which operates on the principle, “never trust, always verify”.
The Vault Password is never stored, ensuring your items remain secure in case of data breaches or network compromise, even from McAfee. Every user, device, and application attempting to access your vault is verified and authenticated before access is granted. This is why a Password Manager is the safest place to store your passwords and other information, especially when compared to storing them on your browser or computer.
So, what happens if I actually forget my password? The simplest failsafe is unlocking your vault with biometrics (Face ID, Touch ID, Voice ID, etc) on your device. Over the past few years, the number of active devices with enabled biometrics has increased from 68% to 80% in North America, Western Europe, and the Asia Pacific. Our initial research also found that biometrics give people the feeling of an extra layer of security, almost eliminating the need to remember passwords.
In my first attempt to address this concern, I made enabling biometrics a mandatory step, bypassing our usual practice of allowing users to "return later".

However, I ran into more questions:
Is it good UX practice, and legal, to enforce biometric unlock?
What happens if a user does not have biometrics enabled at the device level?
How do we communicate the importance of the Vault Password, educate people on creating a strong, memorable Vault Password, and address potential legal implications?
What if a user isn’t aware of the risks of forgetting their Vault Password?
What if biometrics fail?
Designing for people and technical requirements
First, how do we communicate the importance of the Vault Password and teach people how to create a strong, memorable Vault Password?
We looked to content to help communicate this risk, with illustrations beautifully rendered by our Illustrator Kate. This attempted to answer the question of communicating risk effectively.

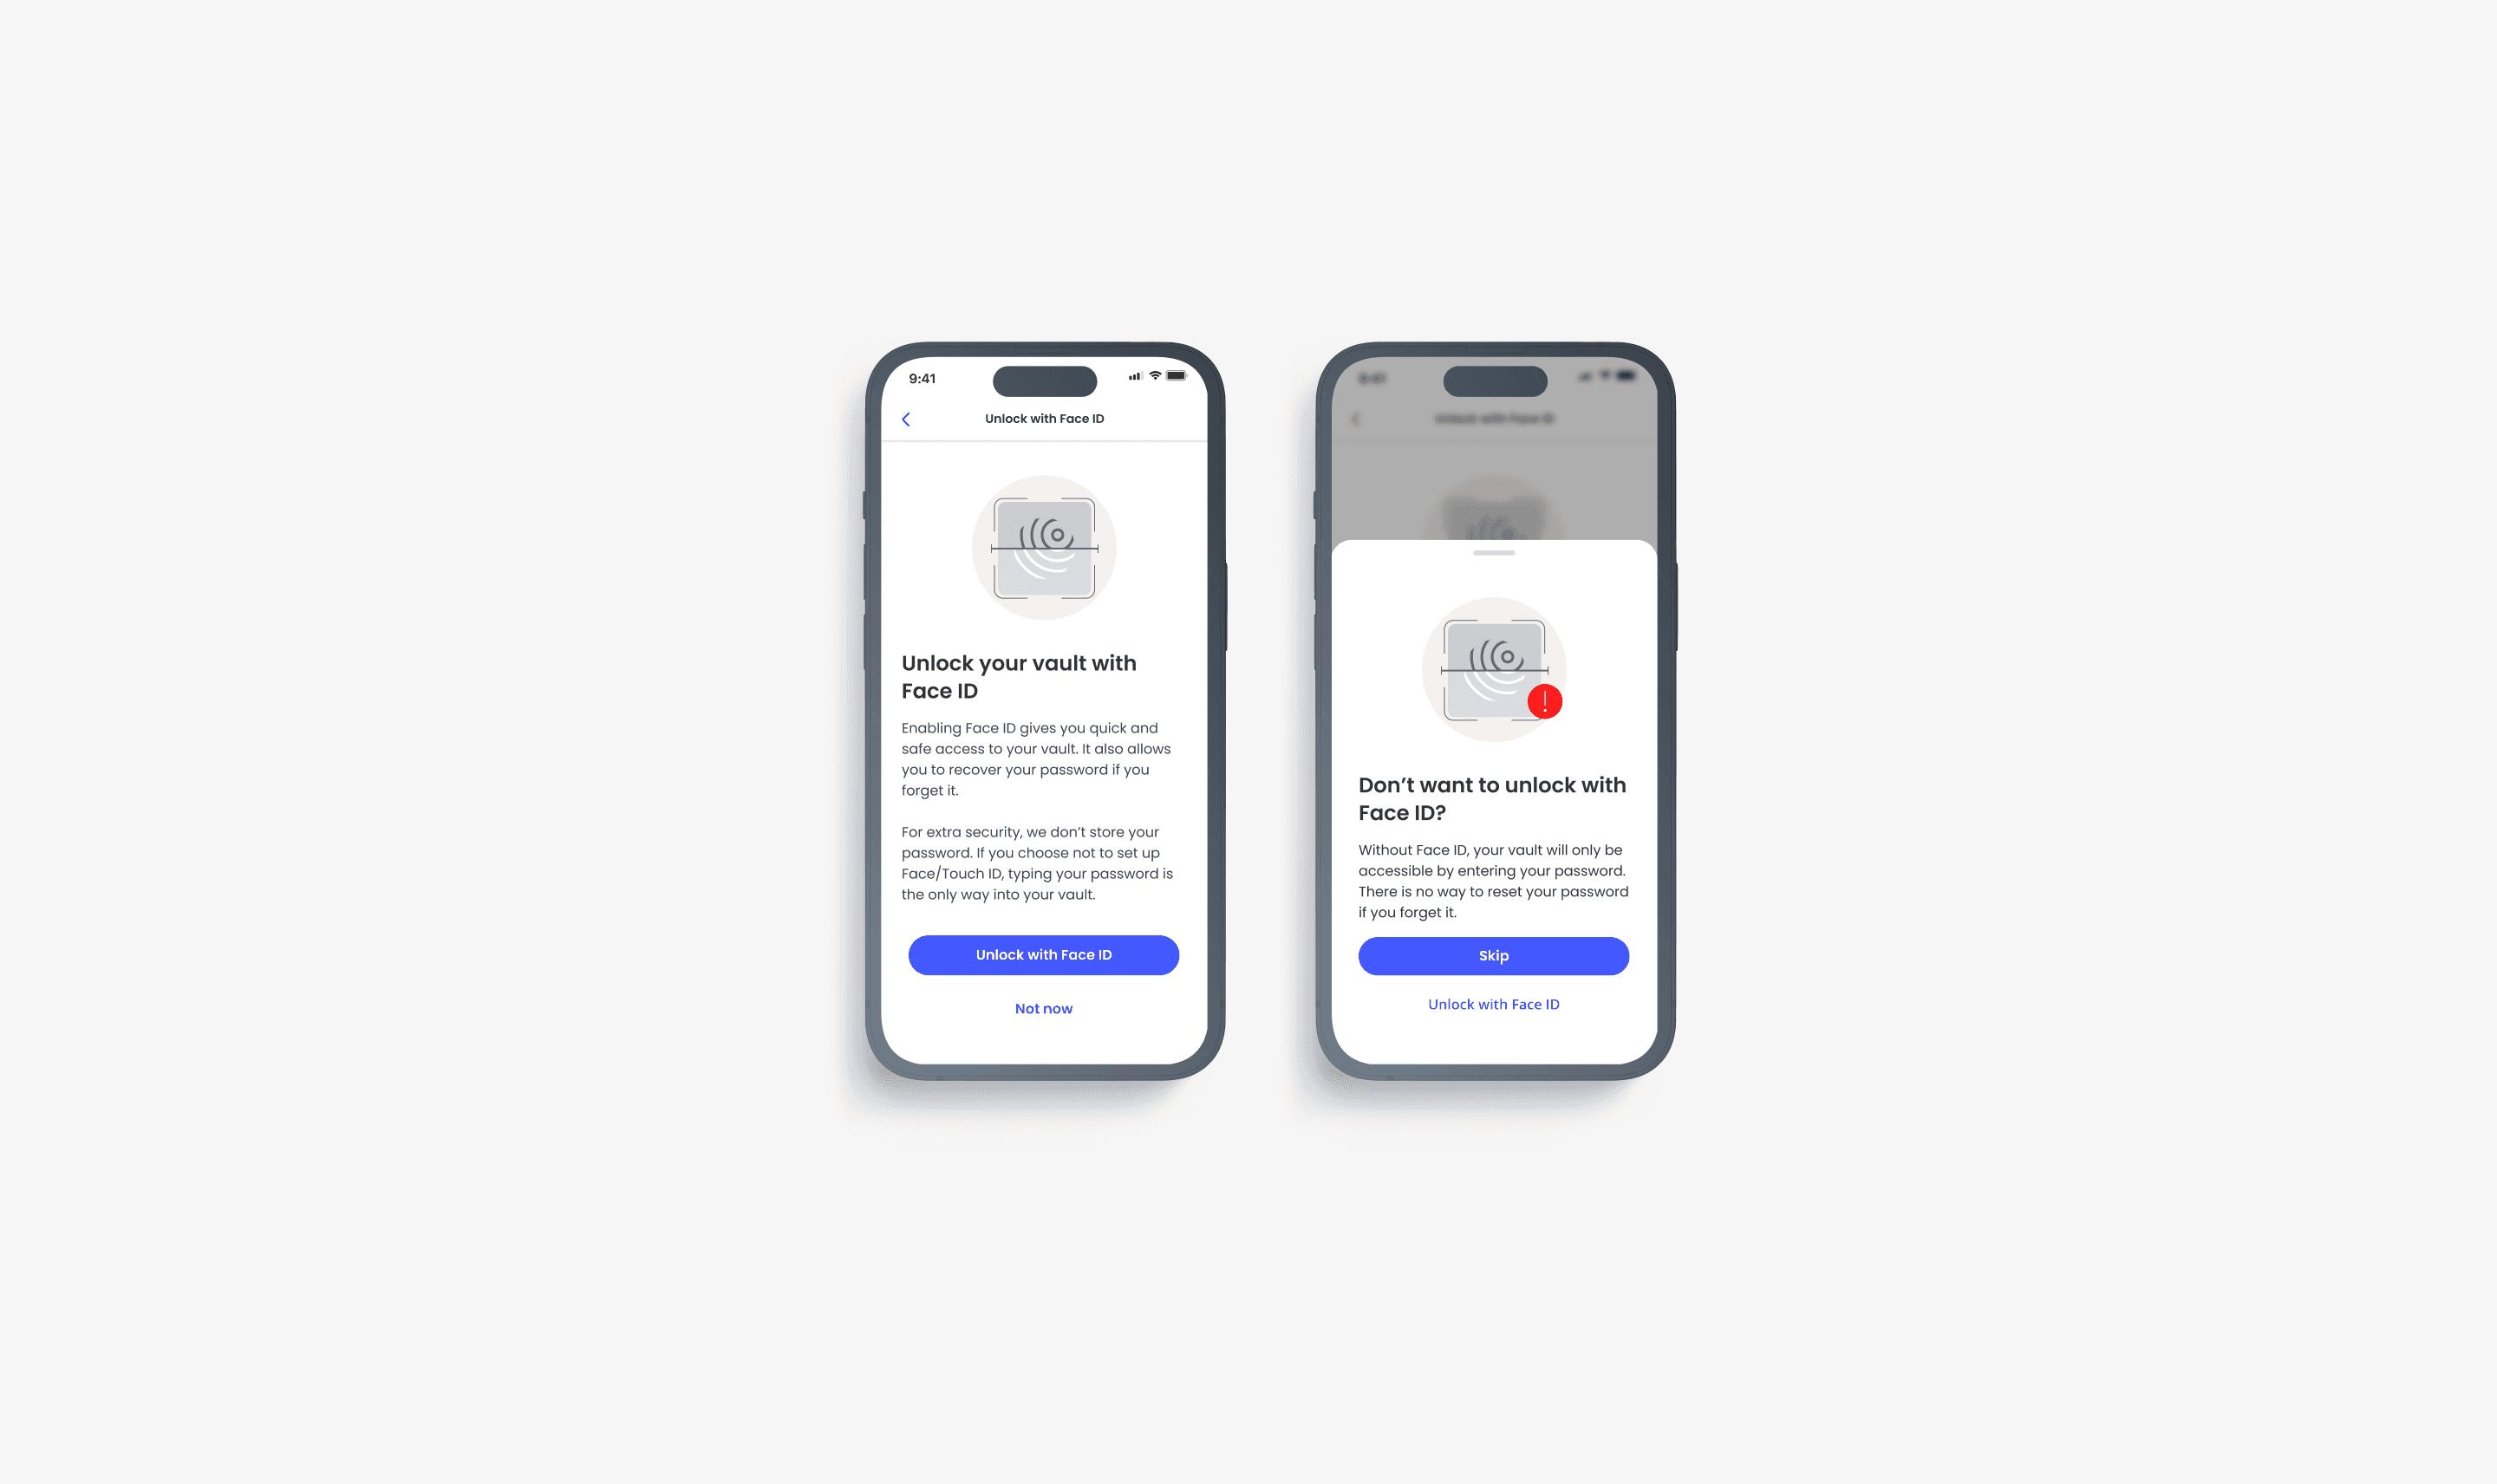
Second, what if users don’t “tap to learn more” about the Vault Password and also don’t have biometrics enabled on a device level?
We emphasized the significance of the Vault Password after its creation, provided tips for maintaining consistent access to the vault, and introduced biometrics as an additional layer of protection and security.

We looked to the content once more to help communicate the value of enabling biometrics.
If a user chose not to enable biometric unlock during onboarding, we planned to prompt them again on the next launch after their first use of the PWM. We decided that we should repeat this prompt once a month, unless the user opts out.

Designing for legal constraints
Our legal team asked us to explore possible methods for people to recover their vaults if they forget their Vault Password. Considering the constraints and requirements of the Zero Trust Architecture Framework, where verification is always required for authentication, this seemed nearly impossible. However, as my father always says, "every problem has a solution…sort of."
In one of the many meetings with the engineering team to address this request, we identified a loophole we could use to our advantage:
If a user has a device that supports biometrics but hasn't given our app access, and they enter the wrong vault password, we could give them a backup option. If they fail a second time, we could suggest they "unlock with biometrics". This lets them open their vault using their device's biometrics. But, this only works on an Android device if the user has already given our app biometrics access. It wasn’t a perfect solution, but it was the best we could do given technical and legal constraints, and still allows us to give a good user experience.

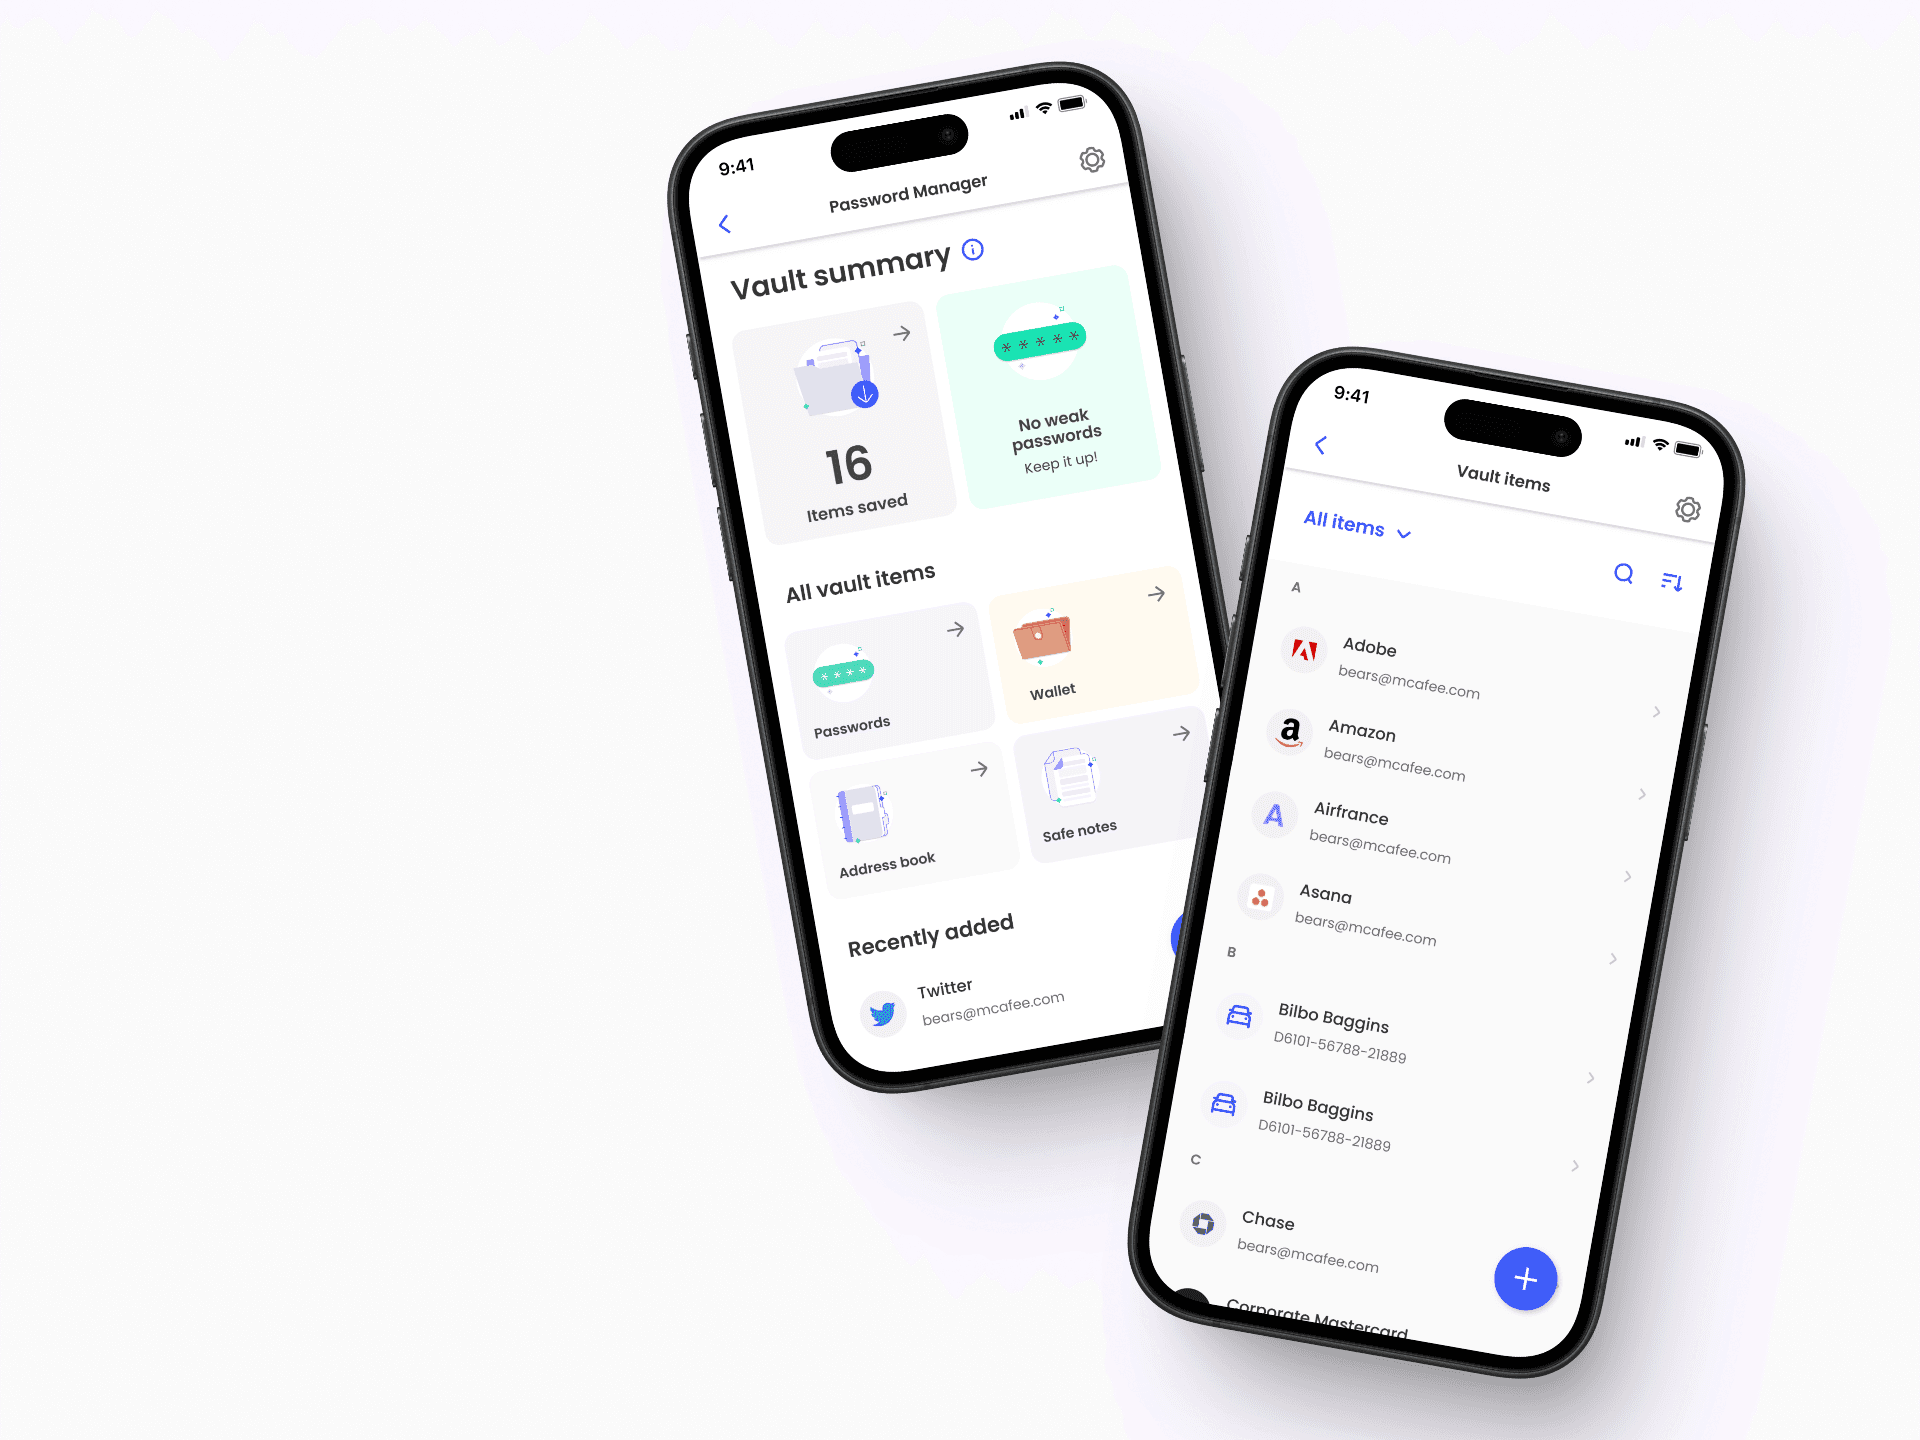
The Vault: where your passwords live
In designing the vault - a secure location for storing all your passwords and other information - my goal was to create a responsive and interactive system. The vault should represent the user's context, particularly during the setup process. To achieve this, the vault needed to have states that align with the level of use.
For the purpose of this case study, I have simplified The Vault states into two buckets: set up state and post-set up.
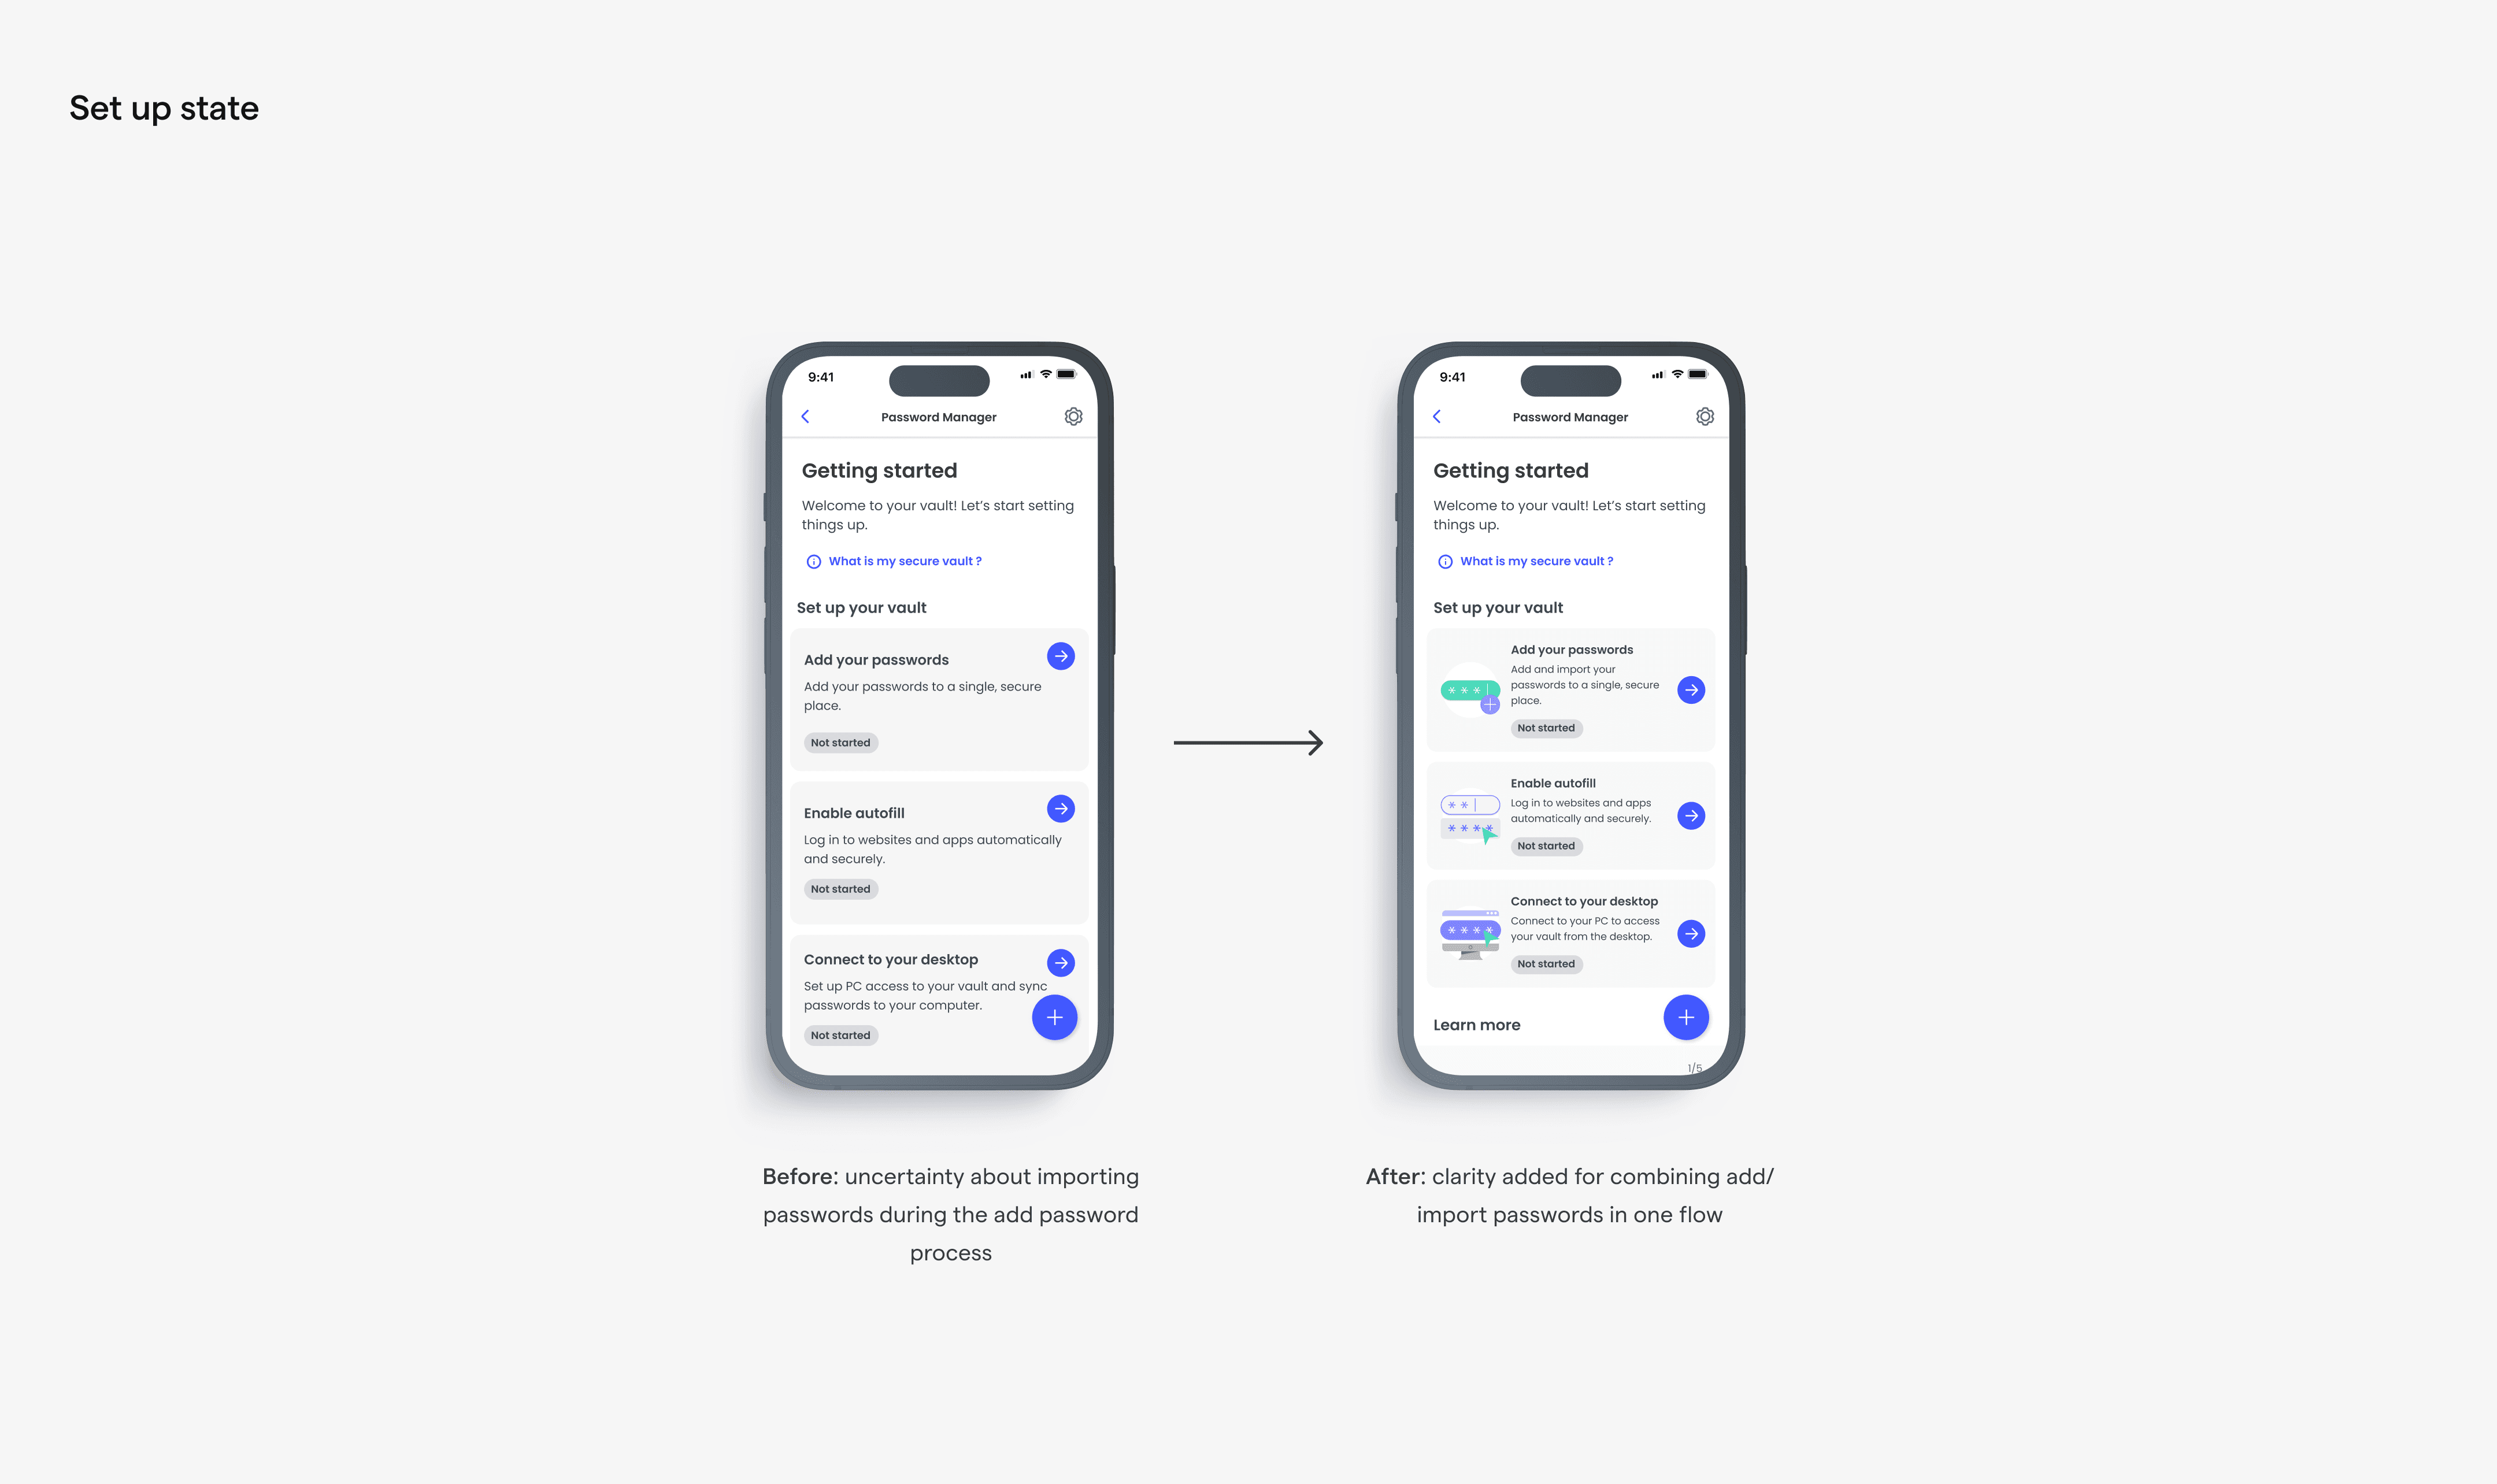
The set up state
As the title suggests, this refers to a state where the vault has not been set up. This implies that none or only some of the top three setup tasks have been completed. Within this bucket, we have three sub-states:
01
The user has not set up PWM (no actions completed)
02
The user has completed only one action
03
The user has completed two actions but has five or fewer passwords saved
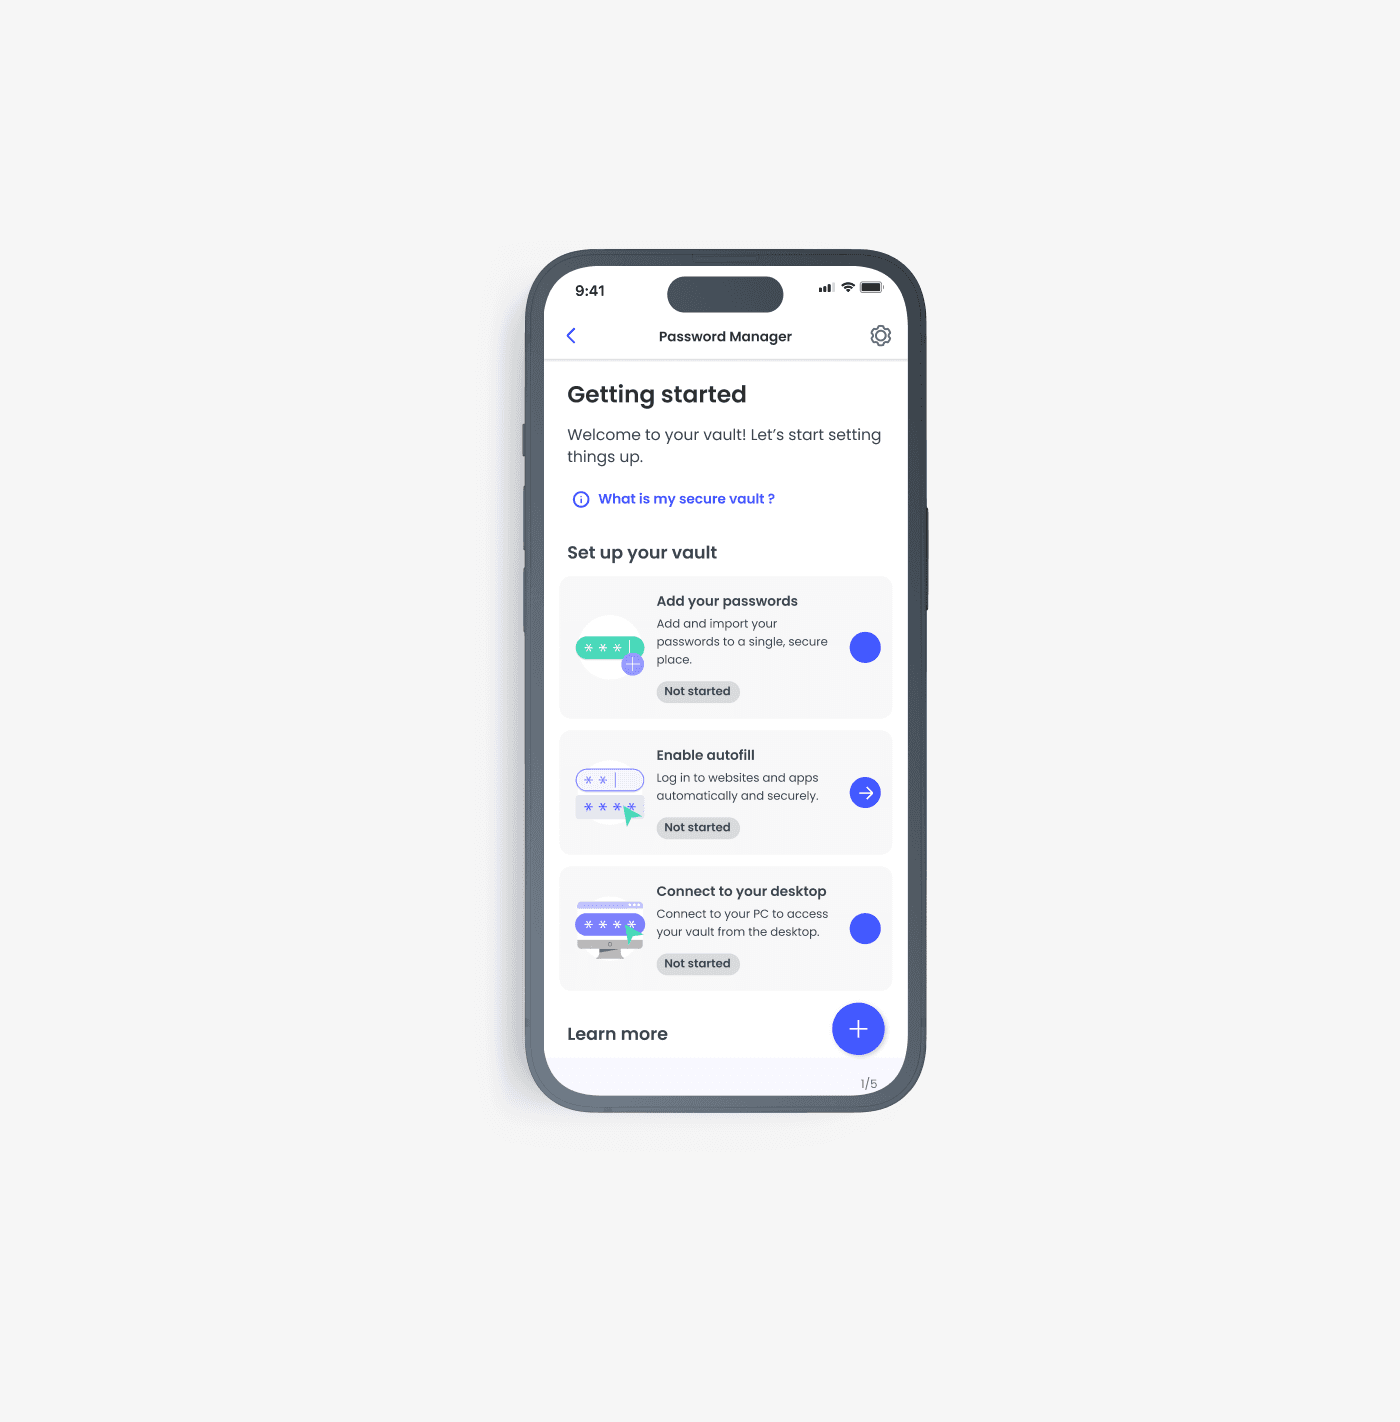


I decided to line up the tasks based on what's most important for our product goals: add passwords → get autofill working for those passwords → access your passwords on a different device. Users can jump in anywhere, but I placed them in this order based on the assumption that users would start with the first task. This assumption was later confirmed in a usability test conducted by one of our researchers on the team.

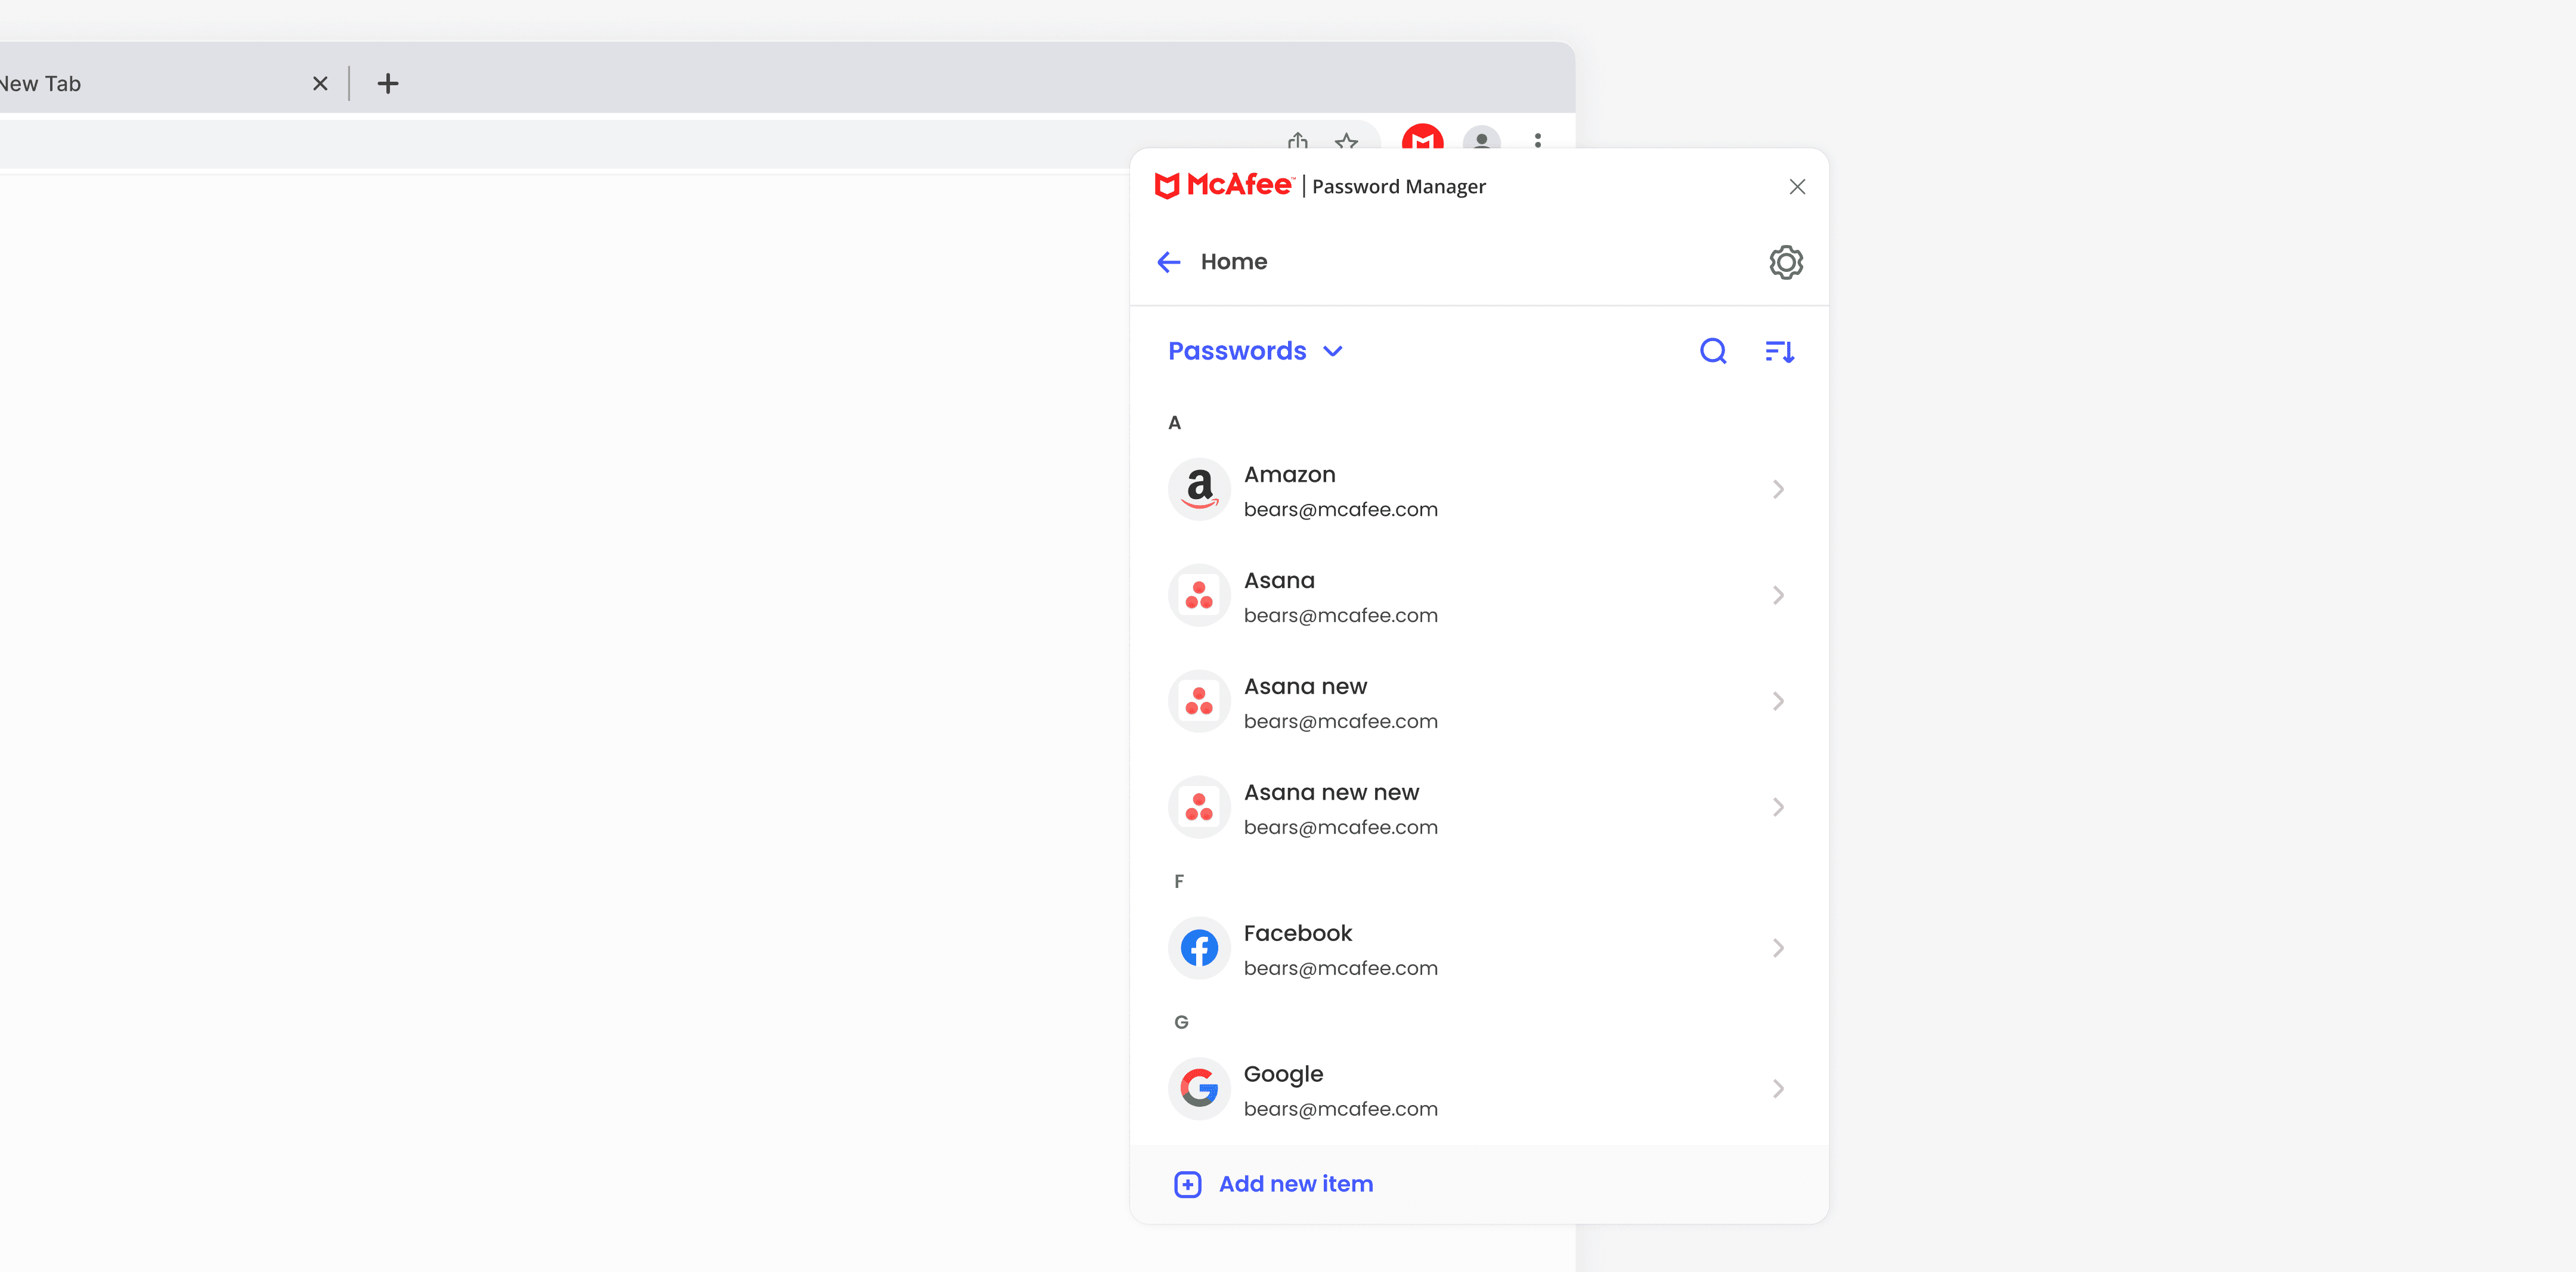
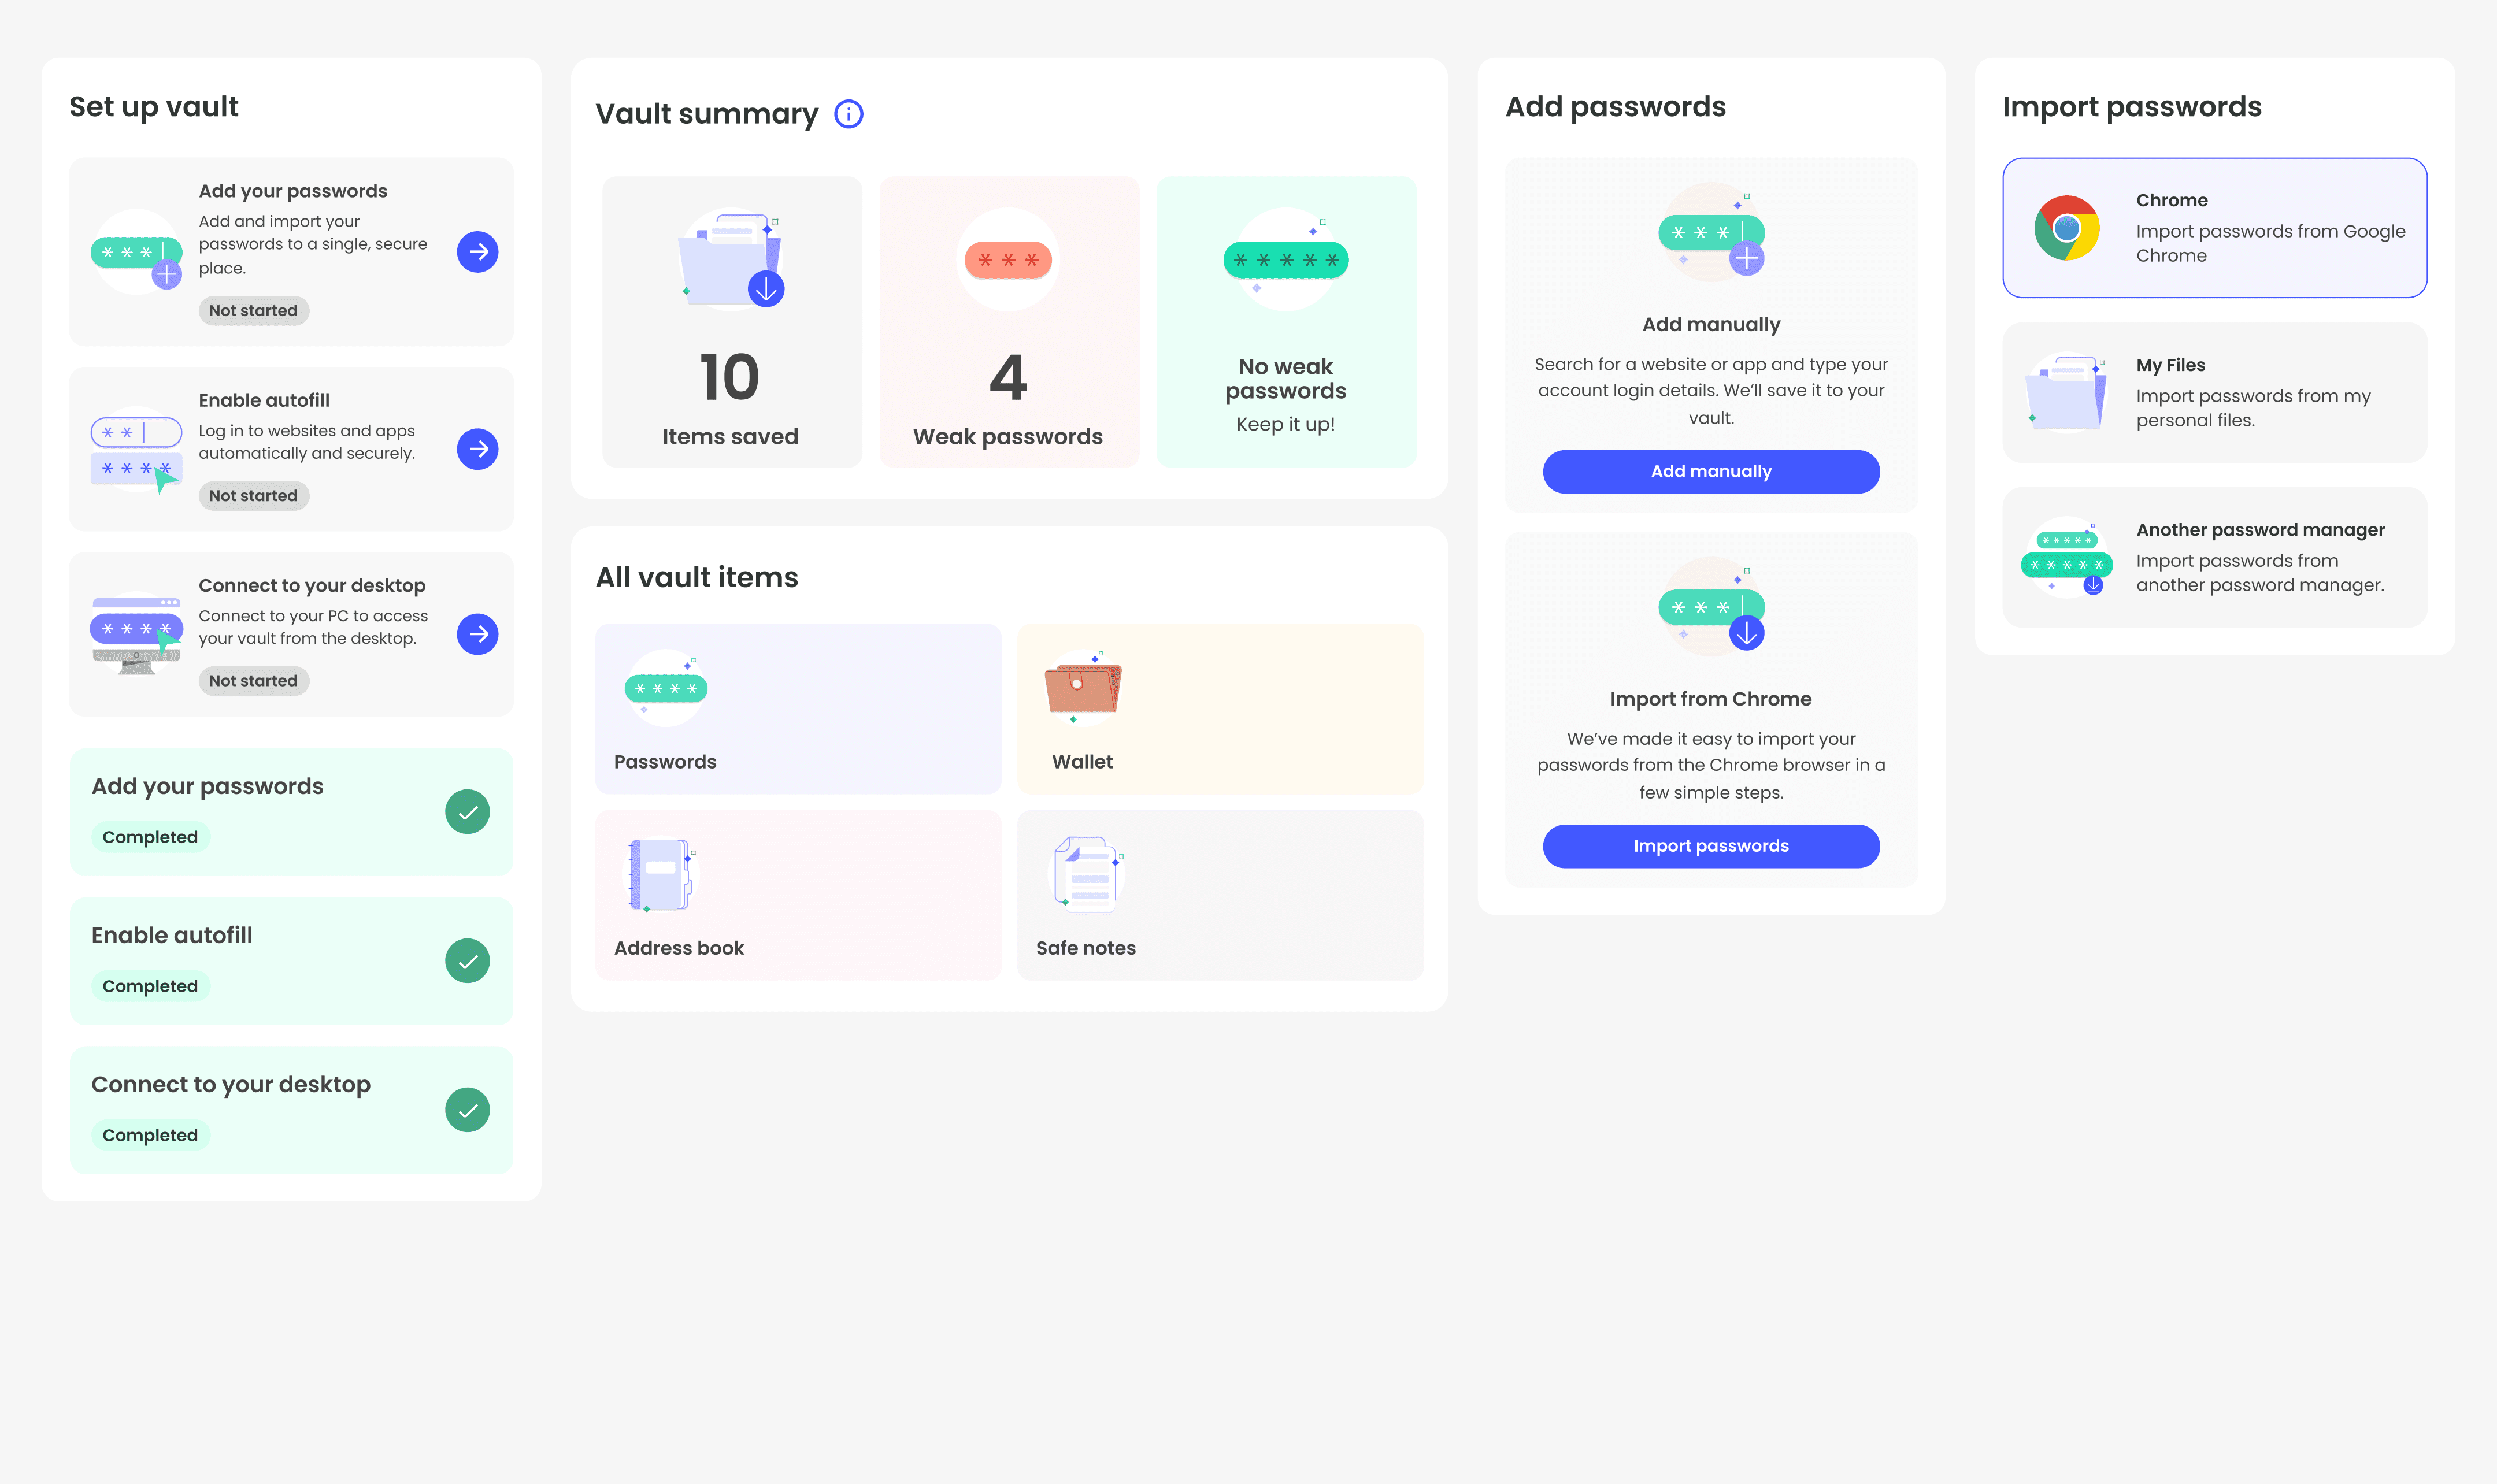
The post set up state
The post set up state suggests that all or most of the set up tasks have been completed. We defined three sub-states as part of the “post setup state”.
01
The user has completed all actions and has more than five passwords saved
02
User has completed all actions and has 5 or less items saved
03
User has completed all actions and has more than 5 items saved


Designing empty states


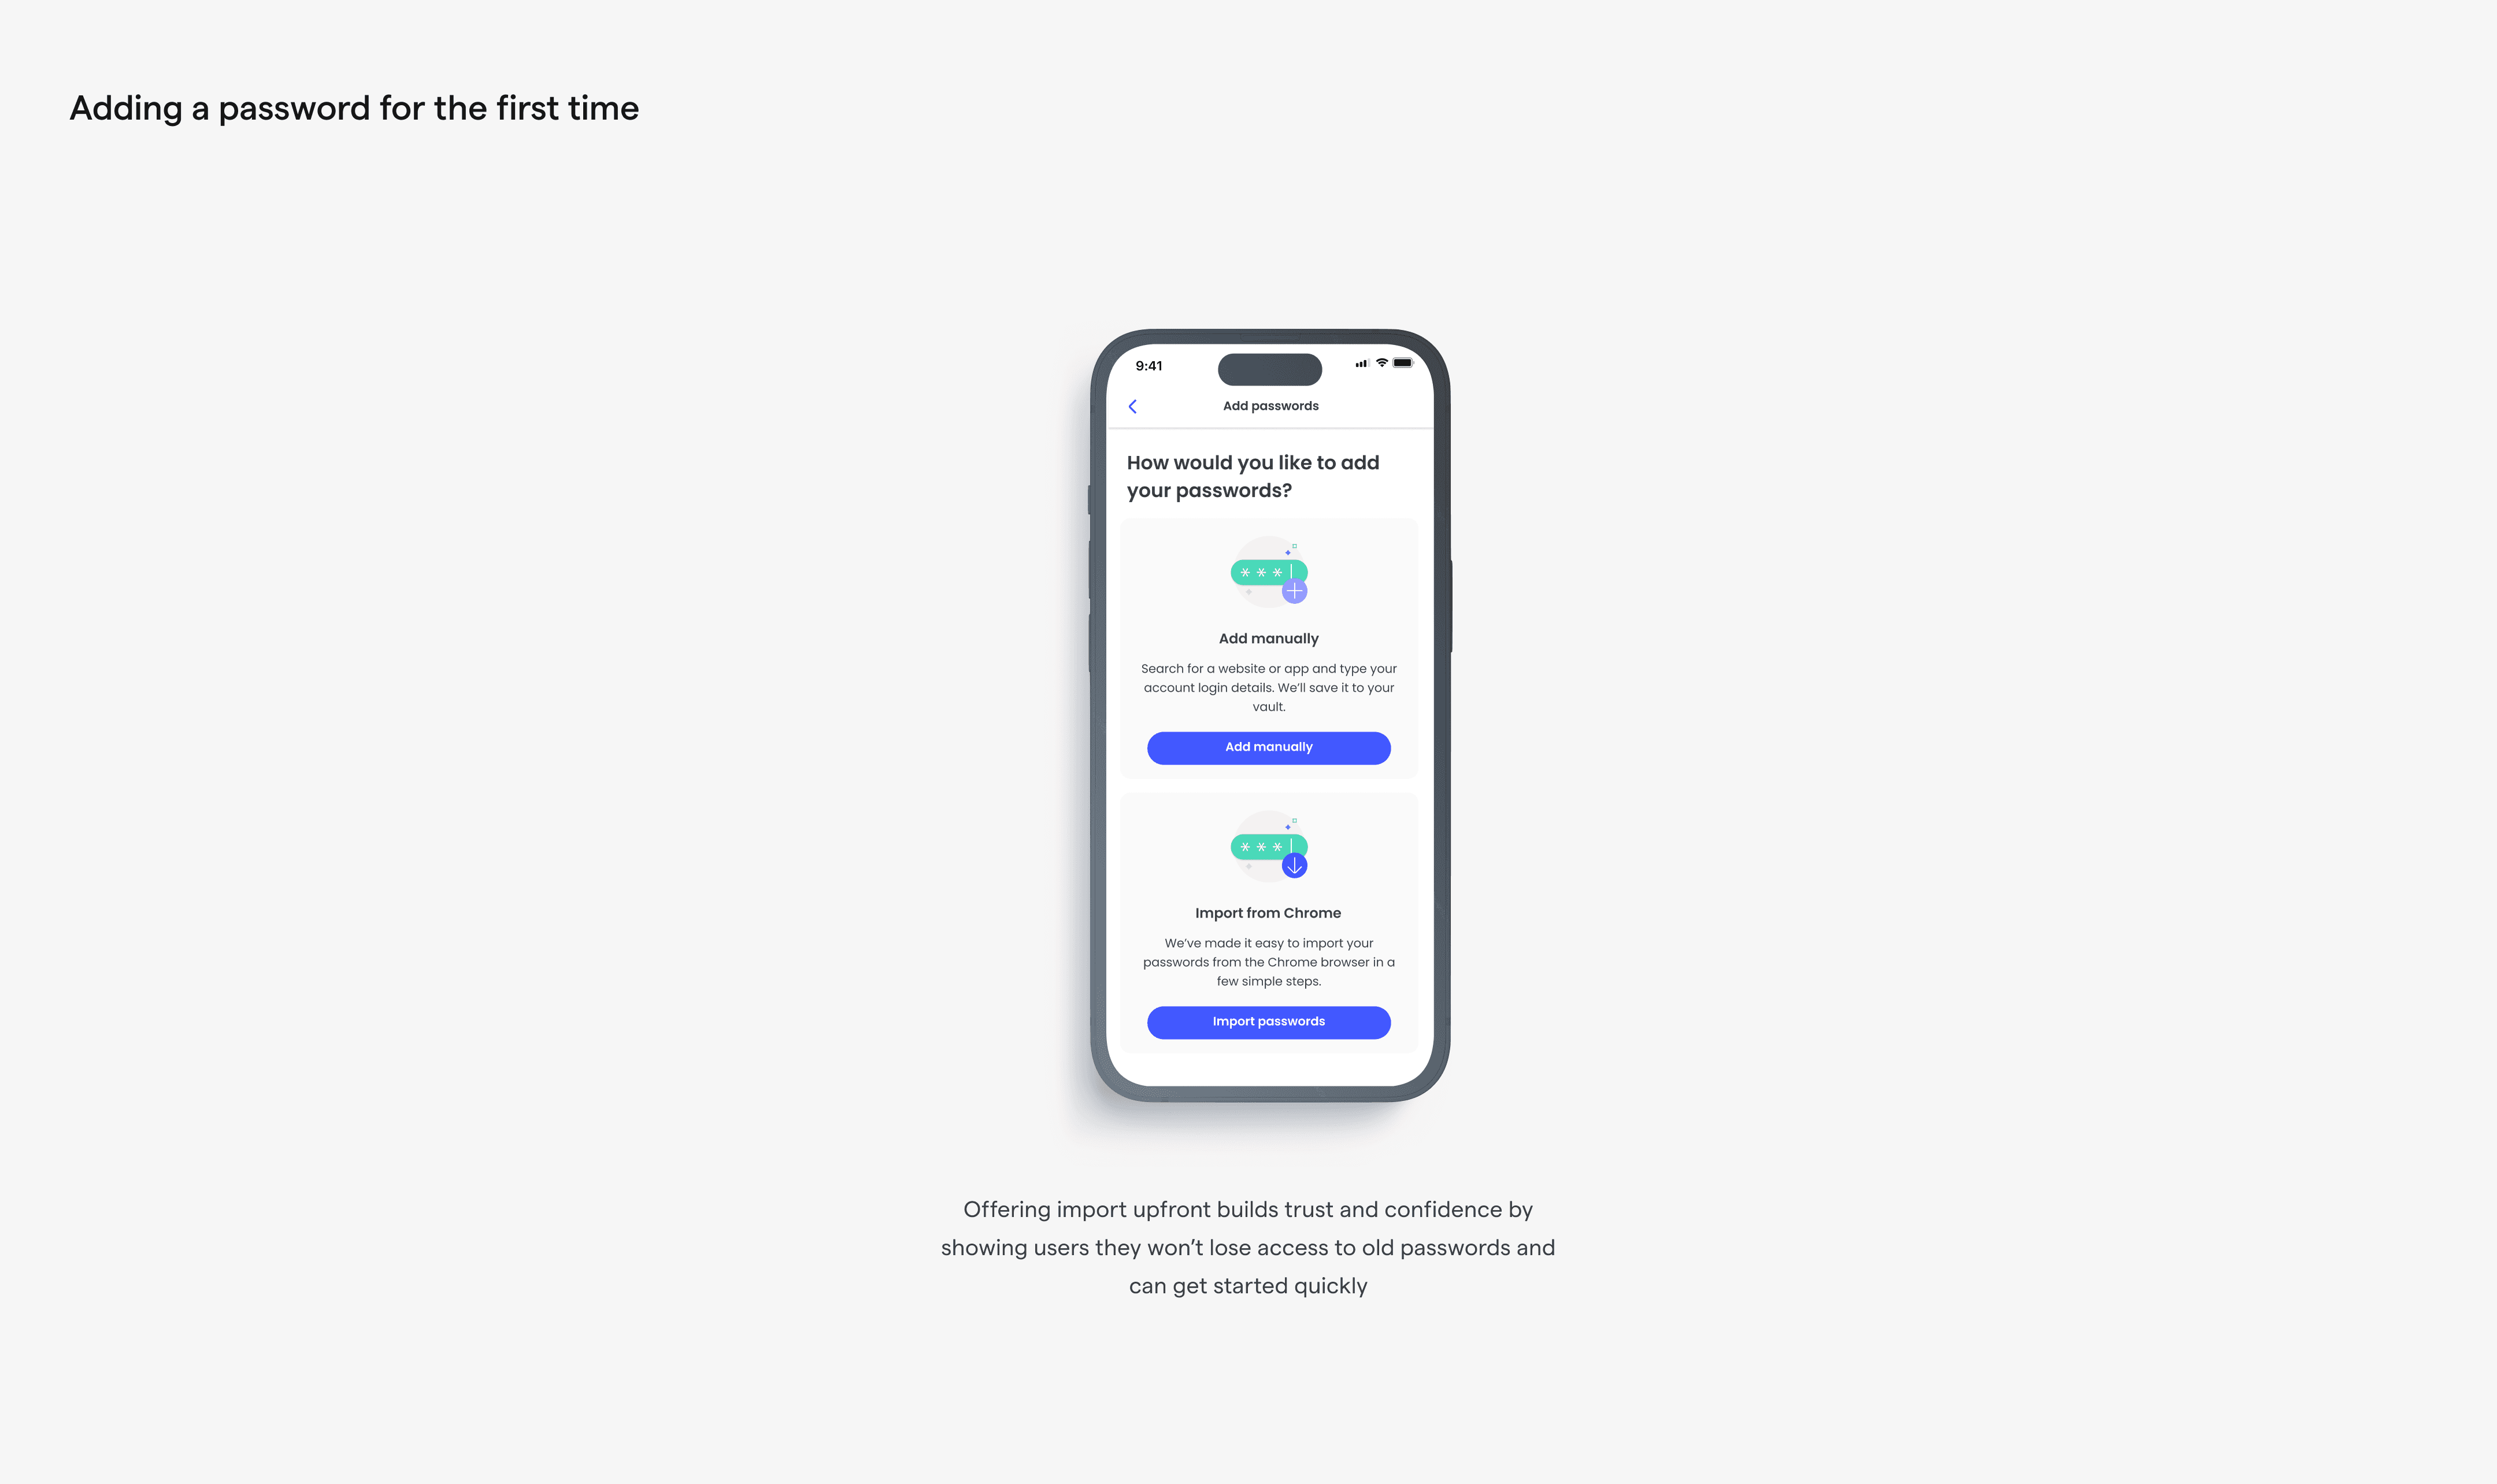
Password transfer made easy
If you recall, one of our user concerns with switching from storing passwords on their browser to a Password Manager was the perceived effort it would take. To address this, we built a simplified import experience, directly from the browsers to our Password Manager. We included this option as part of the “add password” setup task.

Helping people adopt positive password habits
We really wanted to teach users about good password and security habits in simple ways. We also looked for chances to encourage these positive behaviour changes at the right times.
Usability testing and behavioural-change design thinking
We conducted two cycles of user tests and interviews, the first aimed at the onboarding experience, and the second on the password generator. Insights from the interviews led to a redesign of the ‘vault password’ creation screens as part of the onboarding flow. As a team, we realized the underlying goal of what we were trying to achieve with the Password Manager was ultimately to lead users to a positive change in behaviour in password creation and security.
Our UX Researcher helped us articulate this goal with the research study he conducted and subsequently, facilitated a workshop to help us understand how we might apply the behavioural change approach to our design thinking process. The workshop led to a new way of thinking for the password generator we hope will provide more value and help to users.


Visual design & illustration strategy
I worked with two of our Visual Designers to establish the visual language for the illustrations and icons. They were both phenomenal in translating my ideas and infusing brilliant metaphors into the illustrations. Our collaboration resulted in a collection of visual artifacts that not only contributed to conveying the overall design narrative but also brought a delightful touch to the product.


Content Strategy
From the start, Jen who was the Lead Content Designer for the project was keen on infusing inclusivity and accessibility into our language. She approached this project with such dedication to inclusivity and accessibility in ways that I never thought of (changing Master Password to Vault Password being a perfect example).
Considering the technical limitations of the Zero Trust Architecture, the risk associated with forgetting your Vault Password, and potential legal consequences of losing access to your vault, we turned to content as a solution. Content greatly helped us achieve our main goal: encouraging users to improve their password habits.
Outcomes & personal impact
Mentoring in Design
I got to work directly with, and mentor Sarah, our design intern for the duration of the year. My goal was to guide her through the process and improve her general design skills. I showed her how I work, solve problems, and collaborate with product & engineering teams. I wanted her to gain hands-on experience in solving design problems. I wanted her to learn to think for herself and in turn define her own design thinking process.
As part of my efforts to help her define her own thinking process, I asked Sarah to take the lead on the Autofill experience for the password manager, providing guidance and supervision where needed. I was incredibly blown away by her commitment to her work and to learning and developing a design thinking strategy of her own.


Lessons in leadership
Leading a large team such as this brought on its joys and challenges. My team included 1 Design Intern, 2 Product Designers, a Content Designer, a UX Researcher, and a Visual Designer.
It was essential to communicate effectively, delegate tasks, and establish trust. Through this experience, I became better at design strategy and planning, and better at navigating requirements from multiple stakeholders across the business.
Delegating tasks and giving others control was the most challenging part of leading a team for me. It meant trusting others to give the same effort and focus as I would. But I’ve learned that communication, honesty, and mutual trust are the most important things. It’s key to create an environment where the members of my team confident in the vision and goal, and are comfortable sharing their thoughts and ideas. Working with such talented and committed people makes things easy. Despite the challenges, I'm proud of what we achieved together.